
![]() Last April, I ran in interview with Jeff Volpe, President of ViewSonic Americas, about the top trends in computer monitors, with a special focus on ViewSonic. Jeff’s comments intrigued me, mainly because we don’t hear much about ViewSonic monitors in the media trade press. Apple, LG, Samsung, Dell — yes. ViewSonic? Not so much.
Last April, I ran in interview with Jeff Volpe, President of ViewSonic Americas, about the top trends in computer monitors, with a special focus on ViewSonic. Jeff’s comments intrigued me, mainly because we don’t hear much about ViewSonic monitors in the media trade press. Apple, LG, Samsung, Dell — yes. ViewSonic? Not so much.
So I contacted the folks at ViewSonic and asked if I could review one of their monitors that would be particularly well-suited to media production and post. They recommended the VP2776 monitor and loaned one to me for a month to test.
EXECUTIVE SUMMARY

My setup: M1 MacBook Pro (bottom), LG HDR 4K (top left), ViewSonic VP2776 (right)
“The ViewSonic ColorPro VP2776 is a 27” professional monitor that delivers outstanding visual performance and amazing color accuracy. Its IPS Nano Color panel boasts a 2560 x 1440 (QHD) resolution and 95% DCI-P3 color coverage that brings images to life with deep and vibrant colors. An integrated ColorPro Wheel provides easy and accurate color calibration for precise performance, while a 165Hz refresh rate delivers smoother on-screen media, perfect for world-class photographers, vloggers, video editors, animators and game designers.” (ViewSonic website)
The first time I saw an image on this monitor, I was stunned at how good it looked. It has a 1000:1 contrast ratio, 400 nits brightness, and an anti-glare coating standard. For connectivity, it supports USB-C, HDMI, and DisplayPort. I tested all three and all three produced the same image quality. The monitor includes all necessary cables. No wall wart needed, the power cable plugs directly into the wall.
NOTE: If you connect the monitor to a MacBook laptop via USB-C, it will also automatically charge your computer. That single USB-C cable provides up to 90 watts of charging, video signals, USB-A data and stereo audio playback. Cool.
The monitor stand is steel, adjusts 5.1″ vertically, swivels 120°, tilts 21° and pivots 90°. It’s the best monitor stand I’ve seen so far. Solid, with less than a square foot footprint. Apple and LG should take notes on how to build monitor stands. (Smile… it is also included at no extra charge…!) VESA mounts are also supported.
NOTE: Everything about this unit is well thought-out and well constructed. The back of the monitor is black plastic to save weight, and includes a backlight to illuminate the wall behind the monitor with light of three selectable color temperatures to minimize eyestrain when doing critical color grading.
Color reproduction is excellent: 95% DCI-P3, with excellent support for sRGB and Rec. 709. The default setting, DCI-P3, matches the default for current Mac monitors. The monitor also includes the ColorPro Wheel, a built-in color calibrator. ViewSonic worked with X-Rite and Pantone to make sure colors are accurate as well as provide color profiling and calibration.

Instructions on using the Color Pro Wheel – courtesy of ViewSonic.
NOTE: To save you a call to support, the “Menu-Go-Back” button is on the side of the device. It took help from their support to figure out how to exit a menu. The button is flush with the ColorPro Wheel’s surface and the same color. If you don’t hold the wheel exactly right, you’ll never find it.
The ViewSonic VP2776 Color Pro monitor makes images look great with rich colors and enhanced contrast. It easily connects to both Mac and Windows systems. It is well-designed and well-built. The only limitation, and it’s a big one, is that the monitor is not a “Retina display.” Images look great. Text looks “moth-eaten.” (More on this further into this review.)
Product: ViewSonic VP2776 27″ Color Pro Monitor
Manufacturer: ViewSonic
Website: https://www.viewsonic.com/us/catalog/product/view/id/75757/s/vp2776/
Price: $853.99 (US)
Warranty: 3 years
INSTALLATION
ViewSonic shipped the monitor to me directly. It was the most securely packed piece of hardware I’ve ever unwrapped. Even the outside of the box had bumpers to prevent damage. It arrived perfectly intact.
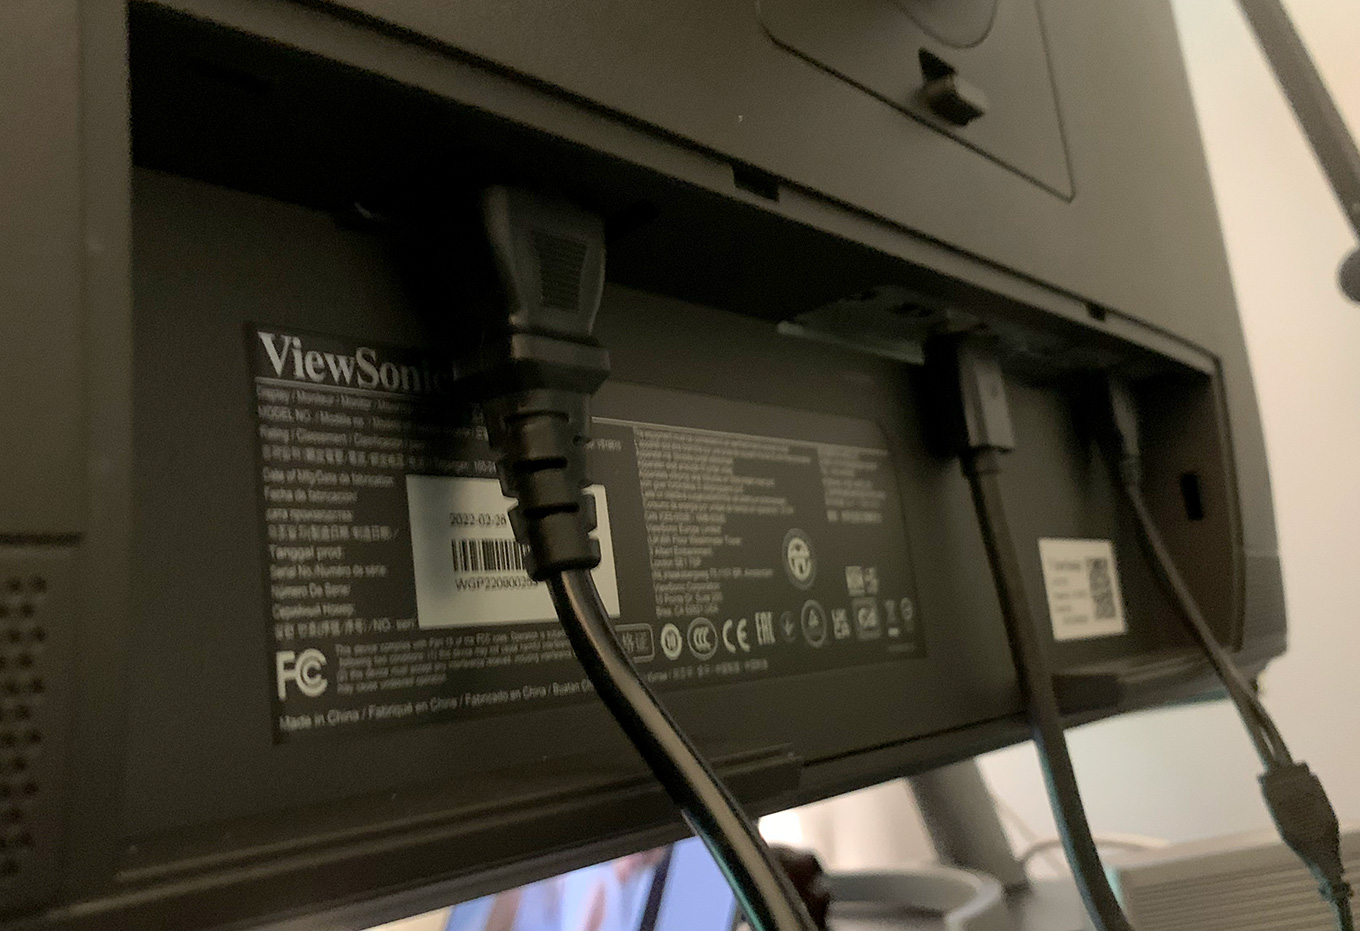
Connecting the monitor is no different than any other monitor – connect it to power, then to your computer. The monitor has a connection tray on the back. However, the easiest way to connect cables is to lay the monitor flat (or on your lap) then connect cables before you stand it up. Connecting cables when the monitor is standing is very difficult. Ports are not labeled, so it is hard to figure out what goes where unless you look at it closely.
NOTE: After looking at the closeup photo below, I realized the metal under the ports is engraved/stamped with a label. This label is impossible to read under most conditions. White lables on the case would be much more visible.

The port labels, stamped into the metal, are impossible to read.
Once cables are connected, there’s a plastic plate that clips to the bank panel and hides everything very nicely.
NOTE: I could not find it when I unpacked the monitor, but here’s the link to the User Guide. I had to contact support to get the link.
POWERING UP
There’s a power switch on the back right. Push it and things turn on.
While you can use the wiggly toggle on the back, called the “Joy Key,” the ColorPro wheel makes accessing menus much easier. Connect it using both the micro-USB and USB-A connections to the back of the monitor. (The User Guide does not include any instructions on connecting or using the Color Pro Wheel..)
The monitor stand has a small depression specifically designed to hold the ColorPro Wheel. This is a nice touch. Since you don’t need the Wheel very often, it is nice to have a place to store it.
NOTE: Based on a comment from a reader, let me be clear: The VP2776 monitor works perfectly out of the box. Its default setting of DCI-P3 exactly matches the color space settings for all Apple monitors. The ColorPro wheel is only needed when you need to make adjustments.
THOUGHTS ON THE COLORPRO WHEEL

The ViewSonic Color Pro Wheel, shown sitting on the monitor base.
The ColorPro Wheel is a puck-like interface that simplifies accessing menus and settings on the monitor that are in addition to those found in System Preferences > Display. It contains a top button, a scroll wheel and a side button. It, like the monitor, is well-built – after making allowances for the exceptionally-well-hidden side button which is essential to exiting any menu. But, ah, once you know where this button is, the Color Wheel works great.
NOTE: However, determining how the Color Wheel works is a process of self-discovery. There are no instructions on its use in the User Guide, nor a Quick Start sheet included with the monitor.
The VP2776 supports a variety of “View Modes.” These are custom configurations in support of different workflows:
However, as I cycled the monitor through these, I didn’t see a lot of difference. ViewSonic support tells me: “We have seen differences when we test in-house between the View Modes. It’s not as noticeable on a fully black background, but you can see it more easily on a white background.” These View Modes are selectable using the Color Pro Wheel. There are seven to choose from.
For my tests, I used the Video Edit color mode.
SEE IT IN ACTION
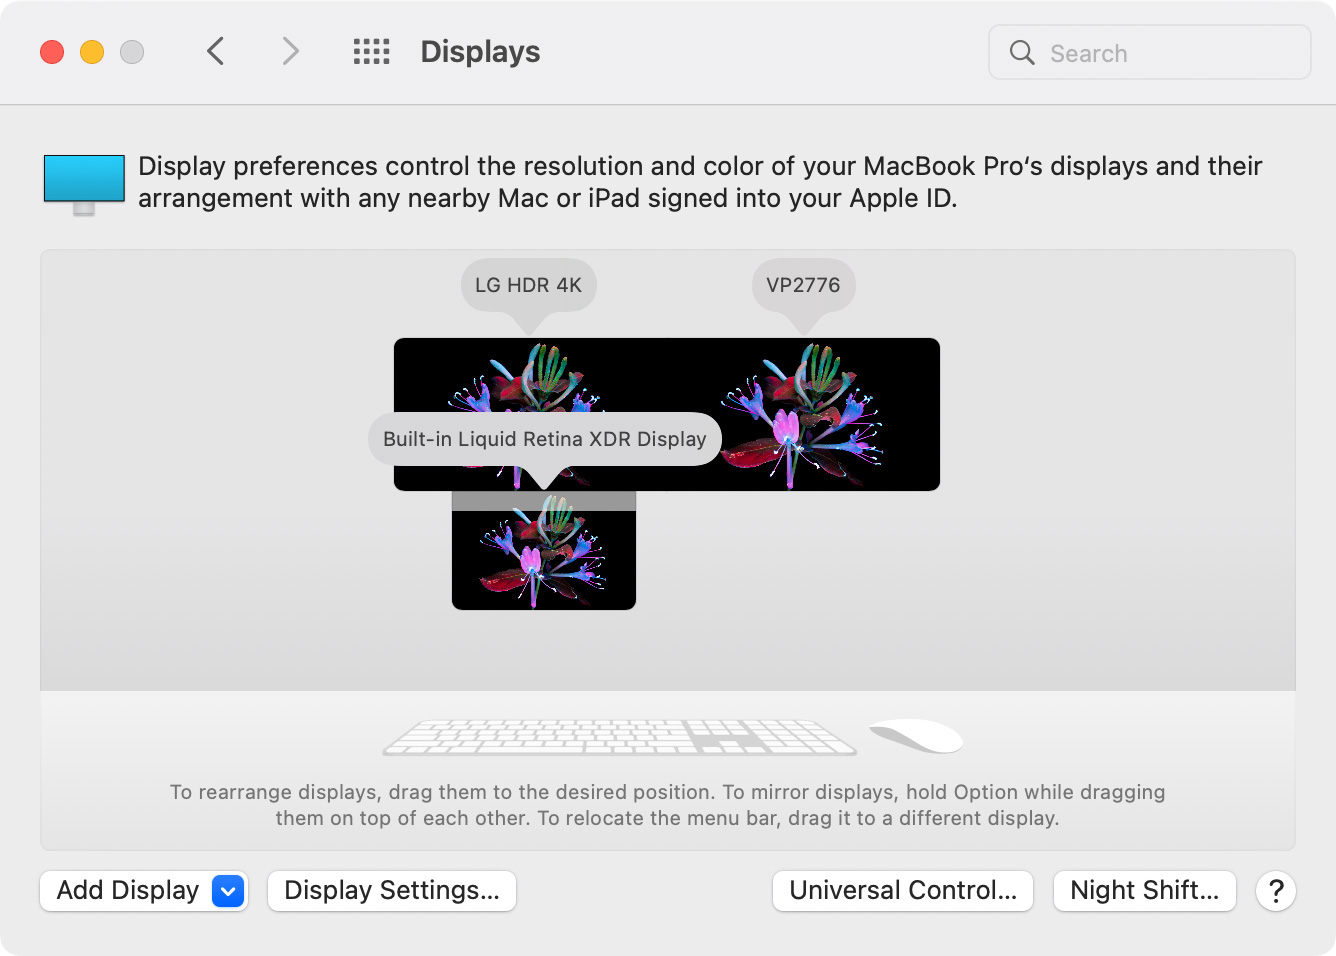
I connected the monitor to both an M1 MacBook Pro and a 2018 Mac mini. Visual results on the two computers were the essentially the same. With the MacBook Pro, I also connected an LG HDR 4K monitor for comparison. Driving three monitors with this computer was no problem.

Here are the technical specs for all three of my monitors.
The monitor works the same as any other monitor connected to the Mac. Use System Preferences > Display to adjust it.

It supports resolutions from 1280 x 720 to 2560 x 1440, however only the 1280 x 720 option provides an equivalent look to a Retina Display (Apple’s term for HiDPI devices).
NOTE: Here’s a tutorial on what makes a monitor a “Retina display.”
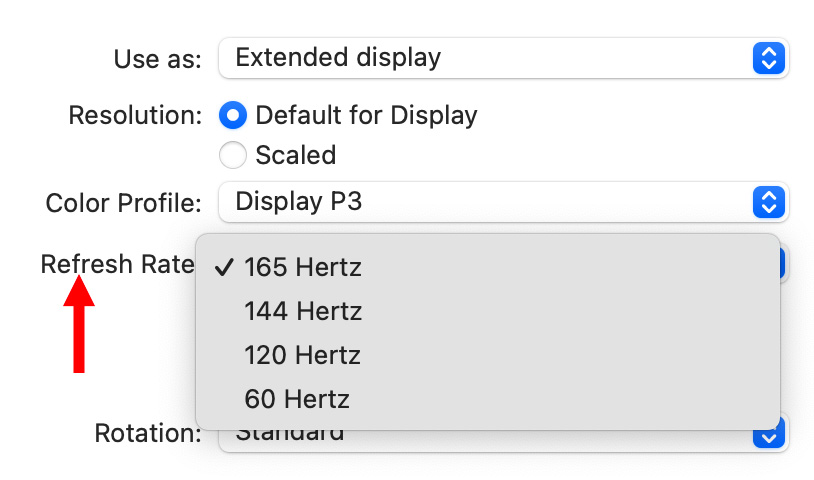
It supports refresh rates up to 165 frames per second. (High refresh rates are for gamers, video doesn’t need anything much faster than 60 fps; OK, maybe 120.)

It provides almost 50 color profiles, with the ability to use the Color Pro Wheel to create an unlimited number more. Rec. 709 / sRGB are fine for editing HD material. HDR will best be viewed using Display P3. There are many other options, depending upon your needs.
The brightness difference between DCI-P3 and sRGB is amazing. P3 makes sRGB look dim and desaturated.
NOTE: I used the monitor in its default settings to scan a variety of older slides and photos, color balancing them using a histogram and looking at the monitor. When the slides were printed they looked great.
When I look at the three monitors connected to my MacBook Pro, the vividness of the ViewSonic makes the other monitors look dull.
From an image point of view, the ViewSonic is pretty amazing.
NOTE: Personally, I find the edge detail/contrast to be a bit much. While this improves the apparent focus of an image, it lends an aura of sharpness. This is a matter of personal taste and you are welcome to disagree. However, as far as I can tell, this contrast setting can’t be adjusted.
WHAT’S A RETINA DISPLAY
Before I get into the key limitation of this monitor, which is text, I need to explain what a Retina Display actually does.
“The term ‘Retina display’ is something Apple made up, and so the term could apply to anything Apple deems ‘Retina’ quality. It first appeared when the iPhone 4 was released in 2010, with Steve Jobs stating that at 326 pixels per inch (ppi), individual pixels are indistinguishable while using the device. This is the closest thing we have to a definition of the term ‘Retina’ that Apple uses in its marketing.” (How To Geek)
In other words, in the past, most Mac monitors displayed video at 72 pixels per inch. A Retina Display squeezes more pixels per inch into the display, yielding a higher perceived resolution. Windows devices call this technique “HiDPI.” In order for this to work, the macOS needs to display assets at 4X the resolution of standard displays (2X horizontally and 2X vertically).
Currently, MacBook Pro computers display images at 144 ppi, which packs twice the pixel density into the display. This higher pixel density means that images and text are sharp and crisp, with little to no edges visible at normal viewing distance.
So, why is this relevant?
The ViewSonic monitor displays 2560 x 1440 pixels at, essentially, 72 pixels per inch. This tends to make text – especially in menus – look ragged. While images look really good at 2560 x 1440, text does not. And that could be a problem, depending upon the work you do.
THE PROBLEM WITH TEXT
The problem with the ViewSonic VP2776 is that the edges of text look ragged. They don’t match the smoothness of the LG or Mac monitor, which both support higher-density pixels.
However, to prove this point requires photographing the monitor, because screen shots capture the output of the graphics card, not the output of the monitor.

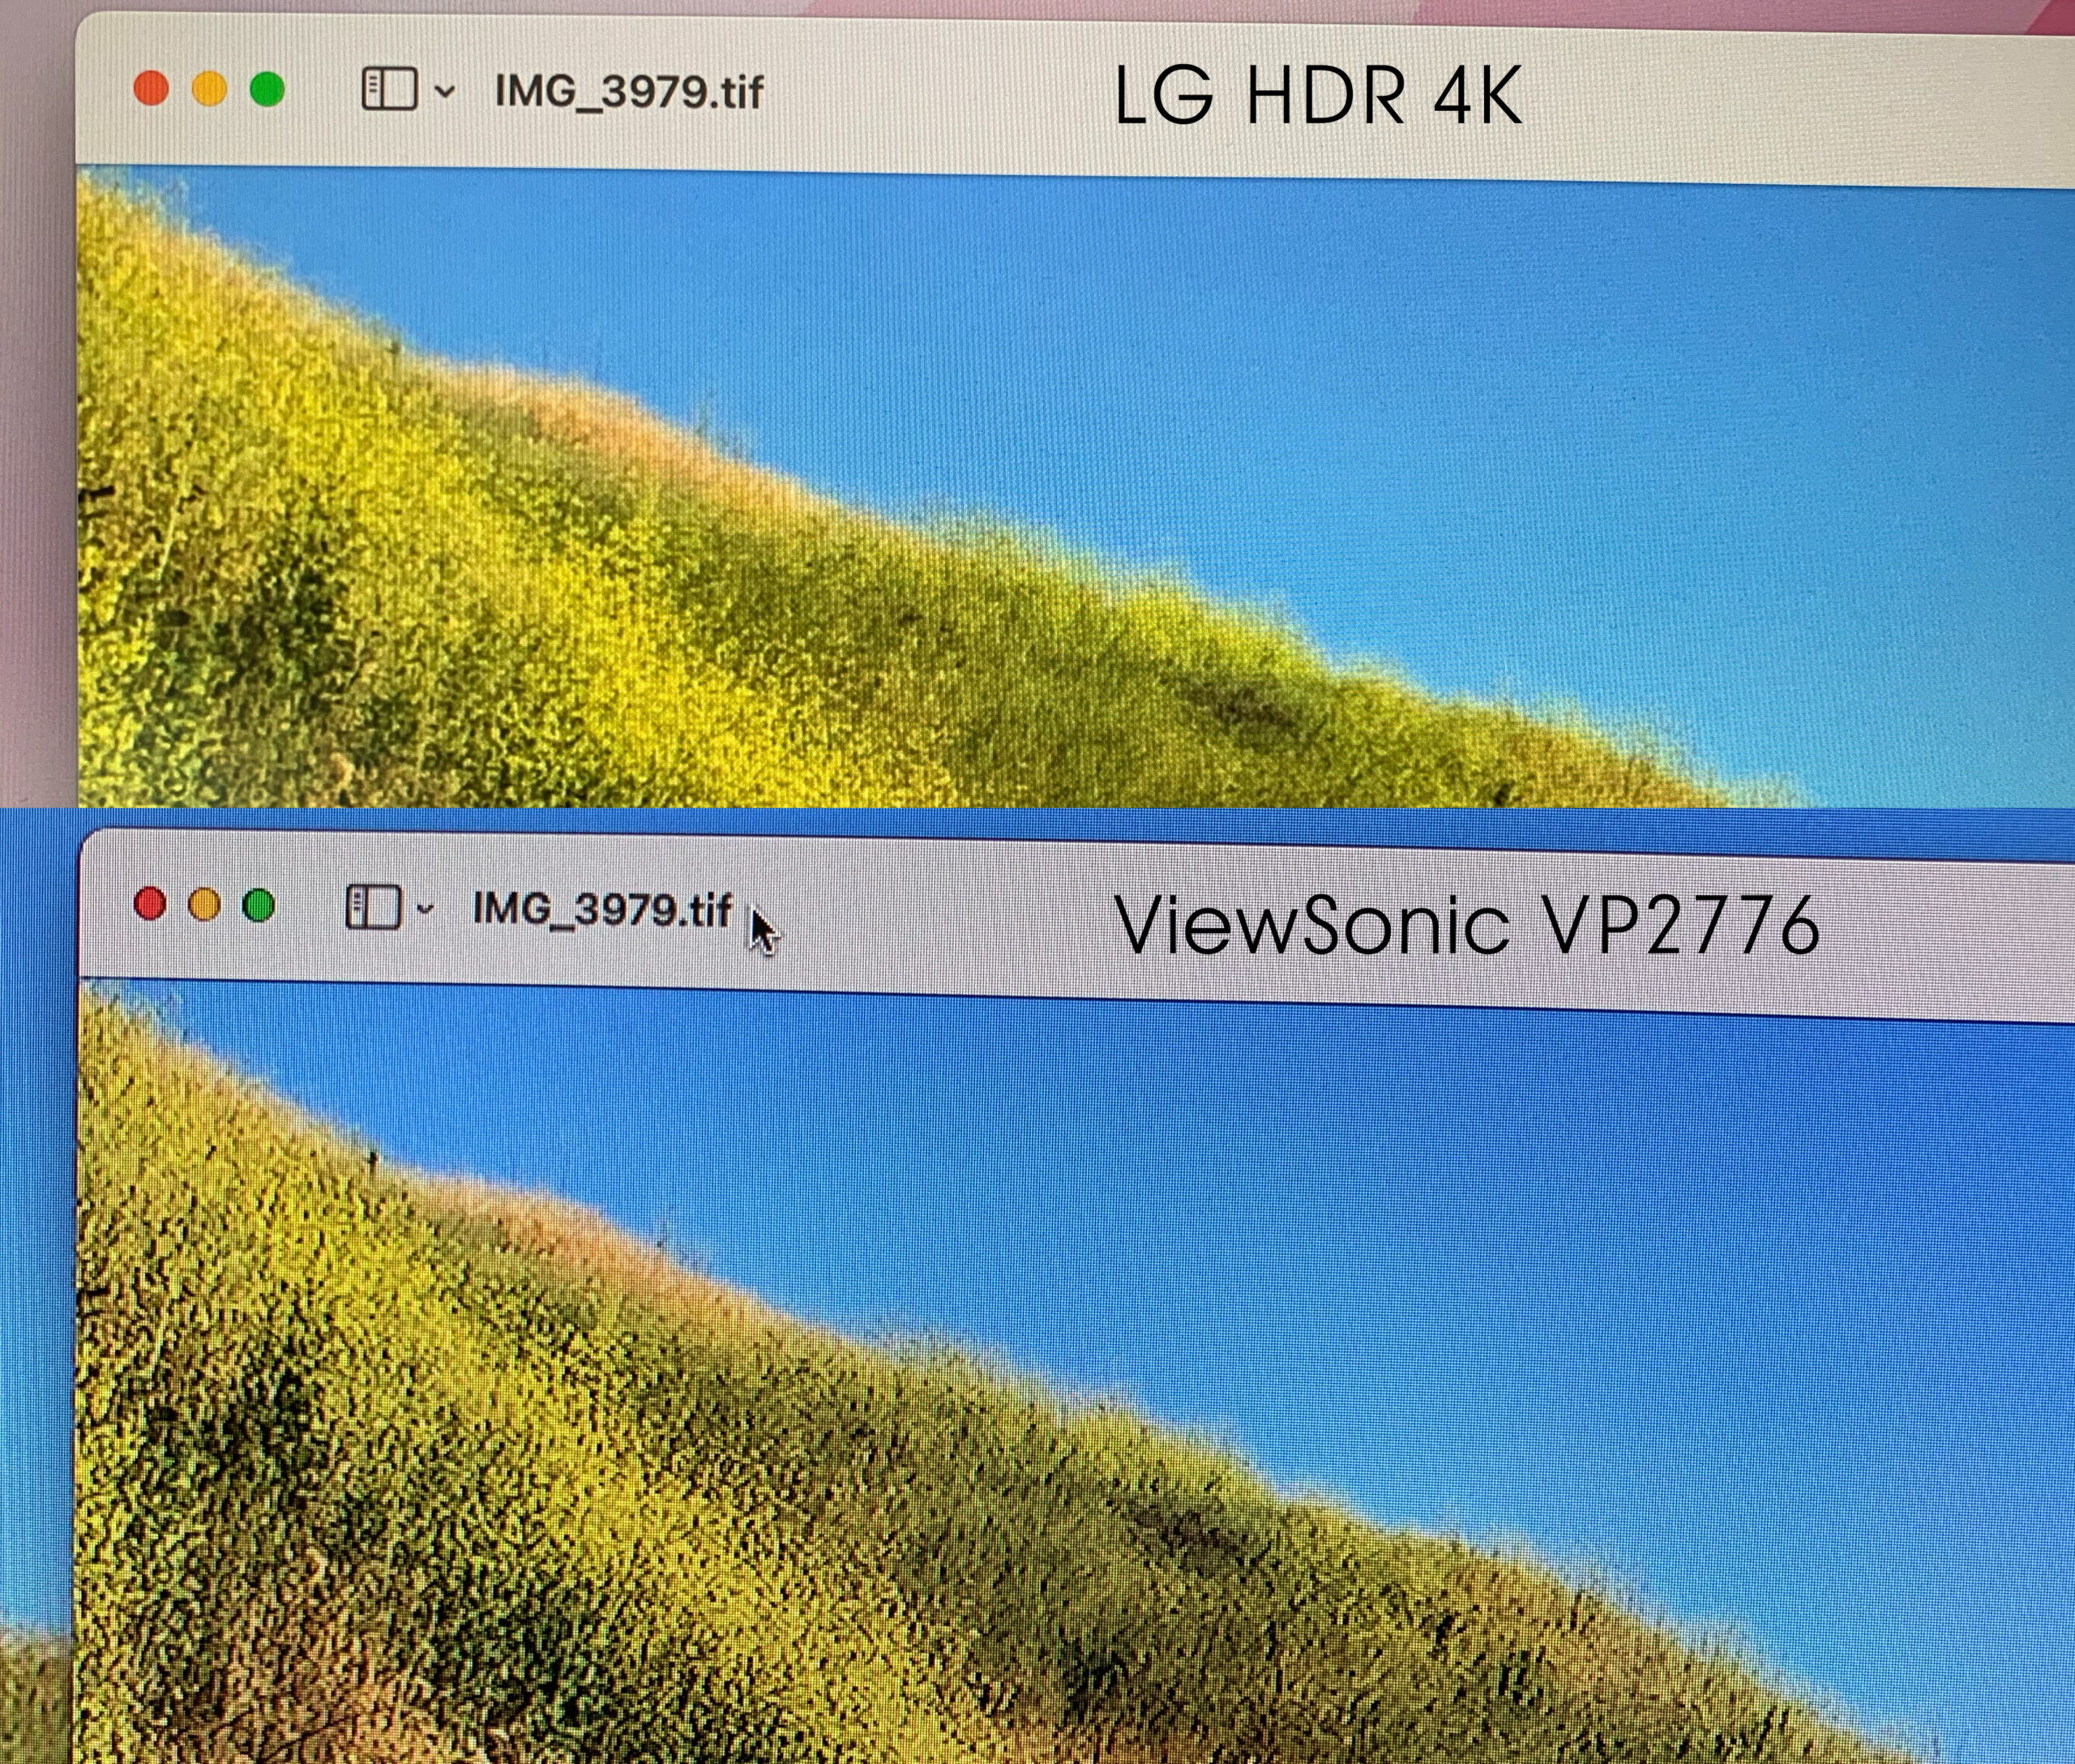
Compare the fuzziness of the text in the menu bar; LG (top) ViewSonic (bottom).
(Click to see a larger image.)
Here’s a good example. The top image is from an LG HDR 4K monitor. While 4K is normally 3840 x 2160, which is the maximum resolution of the LG display, the default setting for the LG is exactly half that: 1920 x 1080. This creates a pixel density of 144 dpi, yielding the high-quality look of a Retina Display.
If the LG display were switched to its maximum resolution, its text would also look ragged and uneven as well. However, the text would be so small that most menus become unreadable.
According to ViewSonic support, “the macOS does not support HiDPI for any external display with resolution lower than 4K.” What I found, though, is that since the maximum resolution of the ViewSonic VP2776 is 2560×1440, less than 4K, we can equal the smoothness of a traditional Retina Display by cutting the maximum resolution in half to 1280 x 720. When you do, the text looks great!
NOTE: The 720 monitor setting is to support 720p video playback. (It also supports 1080p/i playback.) However, I generally would not recommend setting a monitor to 720p simply to get smooth text.
(Click to see a larger image.)
Here’s another concern. While hard to see in this comparison photo, images on the ViewSonic have enhanced edge detail and a stronger contrast. This can make detailed elements in images look “sharp” or “brittle.” This is a matter of taste and you may like it. After a while, I didn’t mind it, but I did notice it.
ANSWERS FROM SUPPORT
I sent several questions to Jenny Faber, Product Manager for Monitors at ViewSonic about the monitor. Here’s what I learned.
Larry: What applications use the HDR settings? My guess is that this would be for gaming, more than video editing.
Jenny: We see video editors complete their HDR content and then enable HDR mode to review the video. It also has gaming use, and as this monitor is also targeted for gaming designers, they’ll also want to see their content as it will be utilized.
Larry: Is there any difference in image quality based upon how the monitor is connected to the computer (DisplayPort, USB-C, HDMI)?
Jenny: The image quality will not be different through different connections (DisplayPort, USB-C, HDMI).
Larry: What settings would you recommend for video editing?
Jenny: If working on a film to a movie theater standard, then DCI-P3 would be most suitable. As many displays still do not support this color space, it is common for Rec. 709 to be used for content on TVs and monitors.
If the user is a general video editor, uses the Internet to publish their content, etc., REC 709 is most suitable. VP2776 has [presets for] many standard color gamuts (DCI-P3, sRGB, REC709…), which can support different industries.
CONCLUSION

(Image courtesy of ViewSonic.)
Sigh… There’s no free lunch.
If your goal is to find a monitor that makes full-screen images and video look great, supports a wealth of color profiles, includes its own color calibration tool, is well-built with a stand that other manufacturers can apparently only dream of, and works perfectly with Mac and Windows computers, the ViewSonic VP2776 27″ Color Pro monitor should be on your short list.
If you spend most of your time working with text and menus, where images only occupy a portion of the screen, the raggedness of text display on the ViewSonic may be too distracting.
No monitor is perfect, but if images are your life, you should make the effort to check out the ViewSonic VP2776. When I look at the same image on all three monitor connected to my Mac, the ViewSonic image looks the best.