
![]() My wife and I inherited dozens of old journals and books dating to the mid-1800’s. Some of the most precious to me are my Dad’s hand-written journals from 1945 – 2000. All these journals and older books provide a unique, personal view of life a long time ago.
My wife and I inherited dozens of old journals and books dating to the mid-1800’s. Some of the most precious to me are my Dad’s hand-written journals from 1945 – 2000. All these journals and older books provide a unique, personal view of life a long time ago.
However, these are far too fragile to send around to the family. So, I’ve spent the last year or two looking for a book scanner that provides high-quality images along with a safe environment to scan books without breaking them. As you can imagine, I’ll only get one chance to scan these before they are sent to a variety of historical societies that want them.
My son, who’s a professional archivist, first suggested I consider the scanner they use; except it’s a $15,000 device. While impressive, this was way, WAY outside my budget. Then I found the CZUR ET24 Pro book scanner.
NOTE: CZUR is pronounced “SEE zer.”
I purchased one for myself last week and have spent the last several days testing it. Here’s my review.
EXECUTIVE SUMMARY

The CZUR ET24 Pro is a high-quality, high-speed book scanner that is designed to scan books, magazines, and other 3D objects. Its color accuracy and OCR quality are limited, but it has a lot of book scanning features that I really like.
It uses a camera, rather than a moving scan head, to photograph images placed below it. It then converts those photos into 320 dpi images for output as Word, Excel, text or searchable PDF files using OCR, or PDFs and TIFFs where images alone are sufficient.
NOTE: Most libraries scan books between 300-400 dpi, which is sufficient for OCR processing. CZUR makes less expensive scanners which scan at a lower resolution. I don’t recommend them if OCR is your primary reason for buying the scanner.
The book scanning features in the CZUR ET24 Pro include:
NOTE: The “binding curve removal” is amazing and well-worth the price of the scanner.
 In addition to this automatic image clean-up, the scanning is fast. Depending upon how you configure a preference, you can scan two pages as fast as you can turn them. I prefer to manually trigger the scan, which means I can scan two pages every five seconds or so. Compared to a flat-bed scanner this is blindingly fast!
For example, scanning a 200-page book on a flatbed scanner would take 6-7 hours and would destroy an older book. The same process on the CZUR scanner would take about 15 minutes and leave the book undamaged.
While the default settings are OK for scanning for OCR, they don’t begin to equal the resolution and correction adjustments of a flat-bed scanner. As well, the camera seems to add a slight green color-cast to all scans, which can’t be removed using existing settings inside the software.
NOTE: Editing the exported TIFF in photo editing software could remove the color cast, but you would need to do that manually for each page.
Also, the user manual is quite poor. It explains nothing about the operation of the scanner. However, tech support responds to questions within 24 hours, though their answers are Windows-centric.
If you have books, magazines or other 3D objects to scan, the CZUR ET24 Pro is a solid choice. Its color and OCR accuracy are not perfect, but its better than any flat-bed scanner at digitizing books.
NOTE: The CZUR ET24 Pro can also send live video of scanned objects – think classrooms and presentations – via an HDMI connection. The software fully supports this function, however, I did not test it as part of this review.
Manufacturer: CZUR
Product: ET24 Pro
Website: https://shop.czur.com/products/etscanner?variant=40313243762736
Price: $649.00 (US) (Available through Amazon.com.)
UNBOXING

The CZUR ET24 comes nicely packaged in an elegant black box, with all the cables you need to connect it to the computer.
However, I also purchased a 6-foot USB-A extension so that the scanner could be located where I had more room a bit farther from the computer. It is easy to extend a USB cable without damaging its digital signal.

(The small packet at the top is the user manual.)
Inside, all the components are nicely boxed and safely surrounded by packing, allowing room for the main unit and it’s components to be re-packed for storage when not in use.
SETUP

Putting this unit together is quite simple. The main stand comes fully assembled. Adding the side lights and cabling takes only a few minutes. The unit attaches to the computer via a USB-A cable.
The unit ships with a flexible black pad, which serves as the background for a book and defines the actual image area to preserve after a scan.
A special point to mention is that a scan can be triggered by the software, an included hand switch, or an included foot pedal. I like the foot pedal a lot because I can turn pages with both hands, while still triggering the scanner. This saves significant time over moving the mouse.
SCANNING
Scanning resolution is 320 dpi. Maximum scanned image size is 5696 x 4272 for a two-page spread or 2848 x 4272 for a single page.

The user manual does not mention this, but the unit is powered on from a switch on the back. The top lights are turned on and off from a switch on the base (red arrow). The side lights are turned on from a switch on the back of the side lights.
NOTE: These base switches also control live video scanning operation and trigger a scan; though the scan button is poorly positioned because it forces you to reach over the book. It would not generally be used as part of scanning, though, perhaps, for live video it is more useful.
Once powered on, control of the unit passes to the CZUR software which supports Windows, Mac and Linux systems. My screen shots are Mac-based.

(Click to see larger image.)
This is the Home screen. Click the Scan button in the lower right to get started.
(Click to see larger image.)
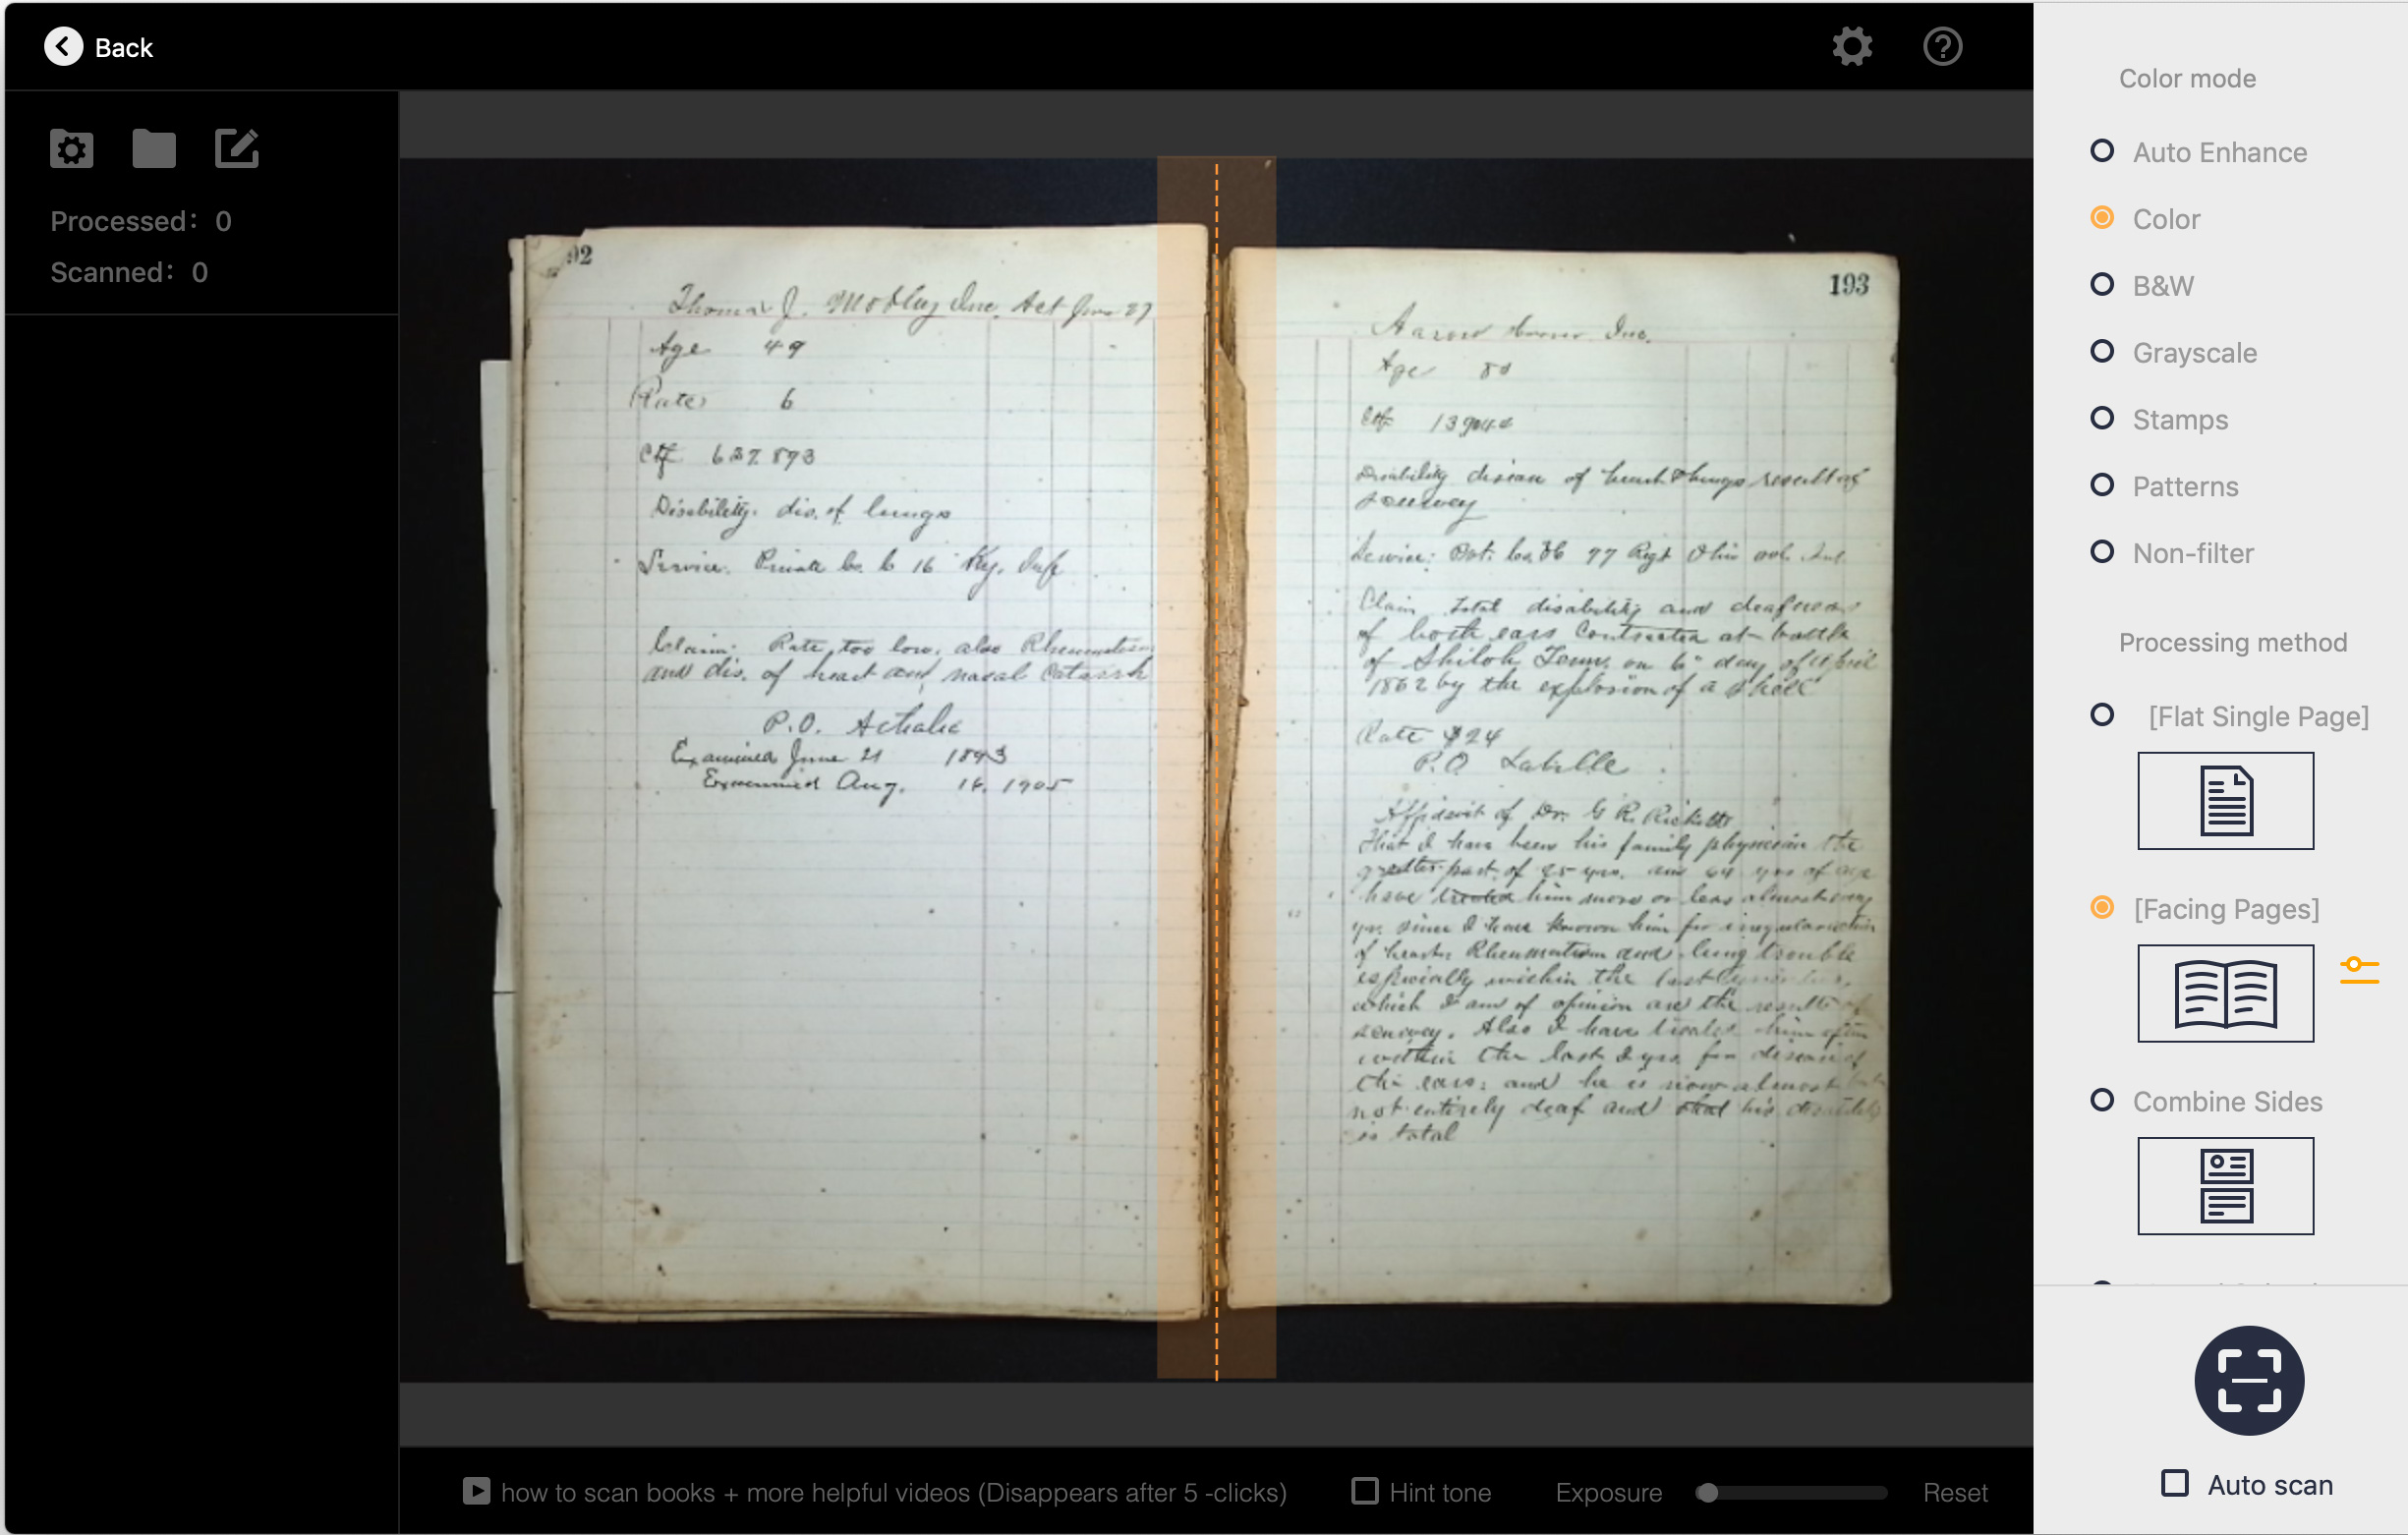
The center image displays the book on the black pad.
NOTE: Allow a slight digression. This journal is from 1880 and is a series of interviews with US Civil War veterans who were, still, trying to get veterans benefits approved by the US War Department. This makes for some fascinating reading. The page on the right is an interview with an 80-year-old veteran who was injured at the battle of Shiloh, in Tennessee. The image is blurry because I reduced the size of the screen for this screen shot.

On the right of this screen are the color controls. I found that selecting “Color” provided the most accurate color reproduction, though it consistently had a green color cast.

(Click to see larger image.)
Here’s a comparison between the Color and Auto-Enhance settings. The different shades of color are more accurate using Color mode, but with a green cast. Auto-Enhance optimizes the text for OCR. While it removes the color cast it severely damages overall color, as you can see from the red subtitles and numbered bullets. The original book pages are pure white.

Below the color modes are selections on how to process the scan:
NOTE: The resolution for all these options is the same, this simply determines how scans are displayed.
Click the orange settings button, next to Facing Pages in the screen shot above or whichever processing method is chosen, to display scanning options.


Once the settings are configured, adjust the spine of the book so it is precisely aligned with the orange line. This enables the scanner to locate the left and right pages.
Click the Scan button in the lower-right corner (not shown), press the physical hand switch, or tap the foot switch to scan the image. The scan itself takes less than two seconds.

The software captures the image, flattens it, fixes any aberrant rotation, separates the left and right pages, then displays them on the left side.
Either turn the page in the book and repeat this process to scan the next set of pages, or click the Back button (red arrow) to return to the Home screen.

The icons at the top allow changing the location where source images are stored (left) and altering the file naming convention (right). The center icon opens the folder where the source images are stored (red arrow).
NOTE: Source images remain stored on your computer even after you quit the program. If you are doing a lot of scanning and need to save space, you’ll want to delete these files once all exporting is complete.
IMAGE PROCESSING

(Click to see larger image.)
Once you are back on the Home page, all scanned images appear in a list on the right side of the home page. (You can also display these as thumbnails.) Whichever image is selected appears at the center of the screen, regardless of whether it is checked.
Click an image name on the right to display it. Roll the mouse scroll wheel to zoom in/out.

NOTE: To illustrate the quality of the scanning camera, here’s that text at 94%. There is lots of detail to help decipher difficult text. (Um, there’s no way that I’ve found to set the display to 100%.)

The tools at the bottom of the Home screen are used (from left to right) to:
EXPORT SCANS

In the right panel, scans can be viewed in a list or as thumbnails. Only checked images are exported. Click the orange check to select all images, or manually select individual images to export.
NOTE: The other two icons select all left pages or all right pages. The folder in the top right also displays the location of source JPEG scans.

When it comes time to export, the options are:
 (These are the default PDF compression settings.)
While TIFF files provide the highest image quality, each page file is about 11 MB in size. PDF, which saves using JPEG compression, reduces file size to about 1.5 MB per page, but also reduces image resolution.

(The PDF is displayed at default compression settings. Click to see larger image.)
This compares the image quality of TIFF to PDF at 75% compression. Clearly, both are readable, but the TIFF is sharper and clearer, with richer color. Both can be zoomed in about 3X.
For most purposes, PDF will be fine. If you plan to edit the image, save it as TIFF.
SCAN COMPARISON
(Click to see larger image.)
One of the frustrations of this system is that there is no way to adjust color or correct for color casts. In the screen shot above, the pages of the book are white. Color mode gives the entire page a green color cast, while Auto Enhance has troubles with reds.
I emailed CZUR support for advice and they suggested I compare the seven different color modes they support to see which one looked best. Of those seven, Auto Enhance seems to optimize the image for OCR, while B&W, Grayscale and Stamps are, essentially, black & white.

(Click to see larger image.)
So, the screen shot above compares an Epson V-600 flatbed scan with three color modes; all scanning the same page and white paper at 320 dpi:
The Epson has the best grayscale values in the lined green paper, the most accurate colors (look at the red “Funeral” at the top) and subtler blues from the different inks used.
The three CZUR color modes had trouble with the red “Funeral,” the blue “YOUTH”, and differentiating a medium-dark blue from black. Patterns also had the greatest color shift toward blue. All three pages have a much brighter exposure.
NOTE: The small circle above the text is the area I measured the white color values using Photoshop.
All of these scans are easily readable, but the way CZUR handles color is harsher and less accurate.

Here’s what a typical book looks like on the scanner.

Here’s what it looks like after scanning in Auto Enhance mode. The curve caused by the spine is essentially removed from the text!
NOTE: CZUR accomplishes this curve removal by flashing three laser lines across the book, mapping the shape of the curve, then removing that image curve using software. This curve removal makes a big difference in readability.

While the OCR only took a few seconds per page, the quality will require careful editing. I noticed that OCR quality seems better when using Color mode.
THINGS I WISH THIS DID
The CZUR ET24 Pro scanner has a lot of very nice features. But there are several things I hope CZUR can correct in a future update to the software:
SUMMARY
 I have about 100 old, hand-written books to scan. There was no way I was going to scan them on a flat-bed scanner.
The CZUR ET24 Pro scanner is powerful tool for digitizing books, magazines and 3D objects. Its 320 dpi resolution makes it easy to see even fine details from a single scan. While its color accuracy does not approach that of a flat-bed scanner, the ET24 provides a fast and flexible way with a variety of export options to digitize printed books and magazines.
CZUR has thought carefully about the features a book scanner needs to offer. It has software limitations which need to be fixed, but, for the price, it will do what needs to be done for most of us. I’m still pleased I bought it, though I hope the software continues to improve.