
![]() Last week, I wrote that the new proxy workflow features in Adobe Premiere Pro (22.5) didn’t work. Not surprisingly, that got the attention of the Premiere team at Adobe. We spent time discussing this last week and found the problem.
Last week, I wrote that the new proxy workflow features in Adobe Premiere Pro (22.5) didn’t work. Not surprisingly, that got the attention of the Premiere team at Adobe. We spent time discussing this last week and found the problem.
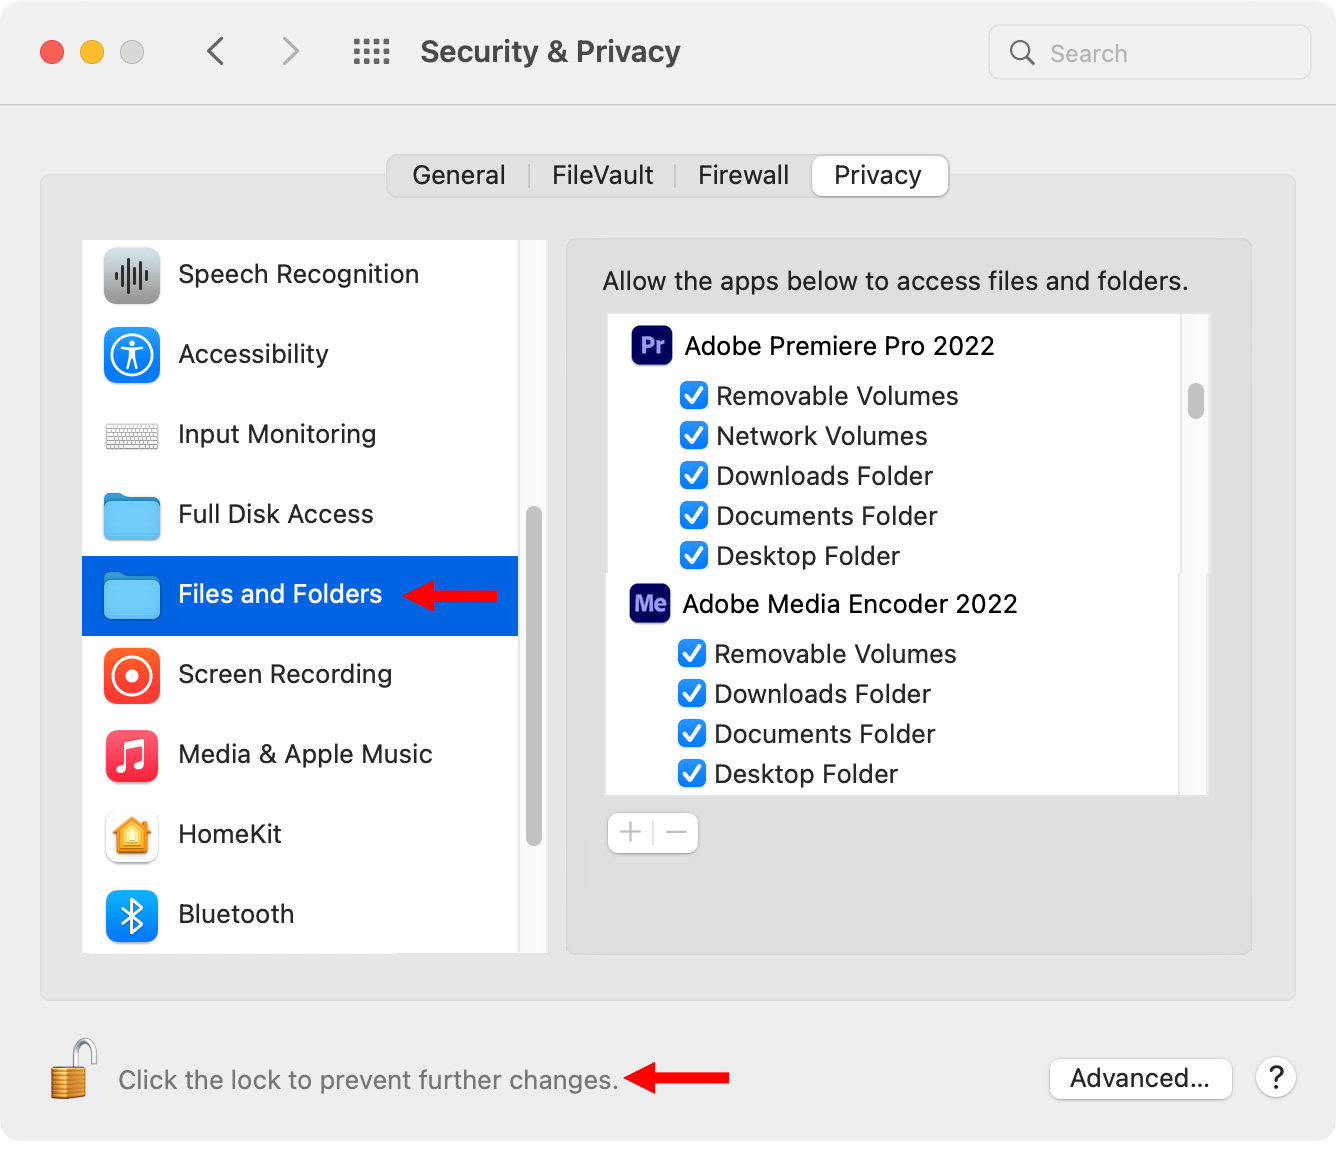
As part of Apple’s long-term goal of preventing applications from surreptitiously tracking what you do on a Mac, we need to grant permission for apps to access different parts of our computer.
During installation, both these apps request access to different elements on your computer. For example, the microphone – for audio processing, various folders on your storage – for accessing and saving files, external storage – for access to media and, if your system uses it, access to removable storage.
It seems that, while in most cases, Premiere Pro and Media Encoder set storage permissions accurately during installation, if these are set incorrectly, proxy creation won’t work properly.
For whatever reason, and after talking to Adobe I’m willing admit this may have been caused by “suspicious operator error,” these permissions were disabled. (I am generally suspicious when an app requests permission to access something without my understanding why. I may have denied permission during installation. I can’t remember.) These disabled permissions prevented AME from accessing media on my removable storage. Once these permissions were corrected everything worked properly.
THE SOLUTION
Here’s how to make sure Premiere and Media Encoder are accessing files properly.
NOTE: AME does not request permission for Network volumes. I don’t know why.
Once permissions are granted – and this only needs to be done once – creating proxies works perfectly.
NOTE: During my conversations with Adobe, they told me that if you have a problem with broken permissions they want to know about it via the Adobe Media Encoder support forum.
CREATING PROXIES
Proxies can be created in two different ways in Premiere
This article describes how to create proxies during ingest, as well as later, after clips are imported into the Project panel.
Link: Adobe Premiere Pro CC: Create an Automatic Proxy Workflow
To create proxies manually, after they are imported into Premiere, select the files (or bins) that you want to create proxies for, right-click them and select Proxy > Create Proxies.
NEW FEATURES
There are several new features in this update to make working with proxies easier.
The first, that I applaud, is defaulting all proxy files to ProRes 422 Proxy. ProRes is a highly-efficient codec, which means that Premiere will edit ProRes proxy files far more easily than H.264 or HEVC. Since the reason you create proxies is to decrease the load on your computer, ProRes 422 Proxy is an excellent choice.
The default setting of ProRes Medium Resolution Proxy is a good choice for most projects.
NOTE: If small file size is more important than editing efficiency, create proxy files using H.264. However, these will bog down your system faster than ProRes proxy.
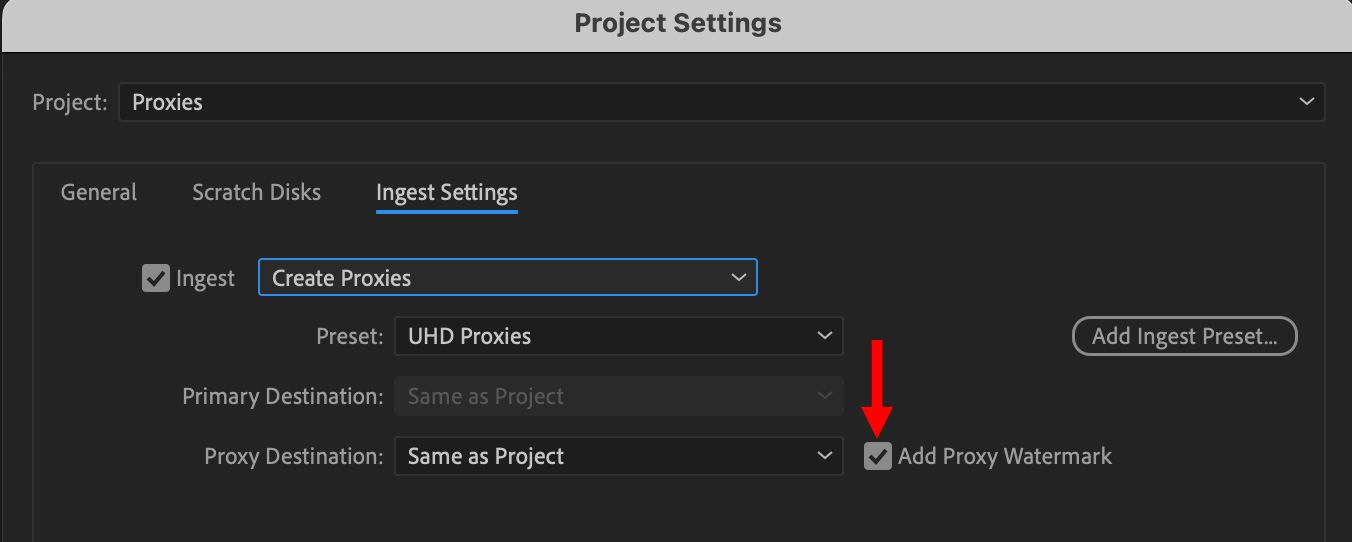
A new proxy creation feature, added in the 22.5 update, is a checkbox to add a burned-in proxy watermark when you create proxies. This makes it easier to tell at a glance whether you are editing source or proxy media.
The screen shot above shows the checkbox used during ingest.
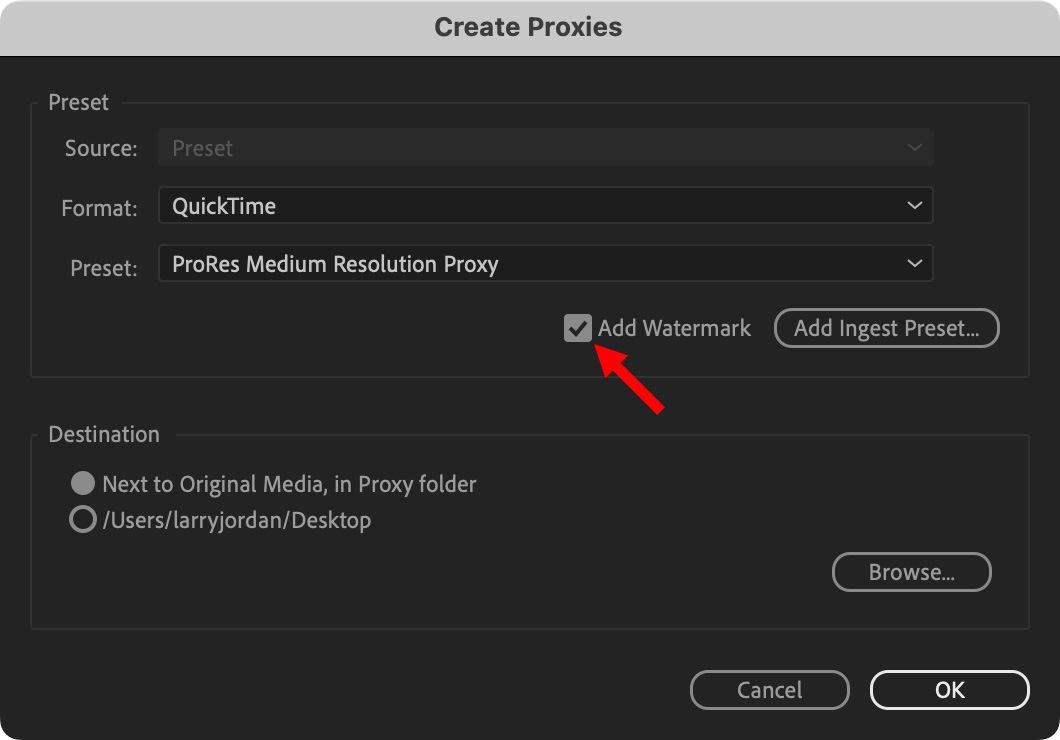
This screen shot shows the checkbox that appears when you right-click media files in the Project panel and choose to Create Proxies. The results are the same; proxy files are watermarked, with the watermark visible in the Program Monitor.
NOTE: Proxies cannot be created for audio-only or still image files.
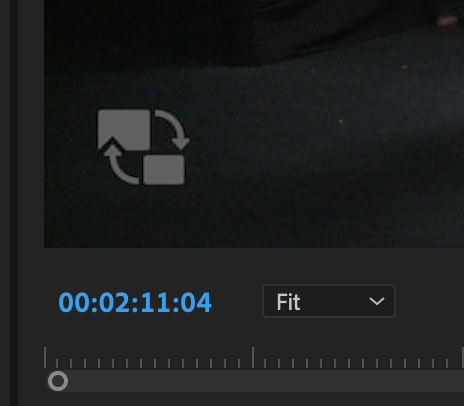
This new watermark is displayed in the lower left corner of the video when you view it in the Program Monitor. Here, I set it over a black background so you can see it. (It’s the icon above the timecode.)
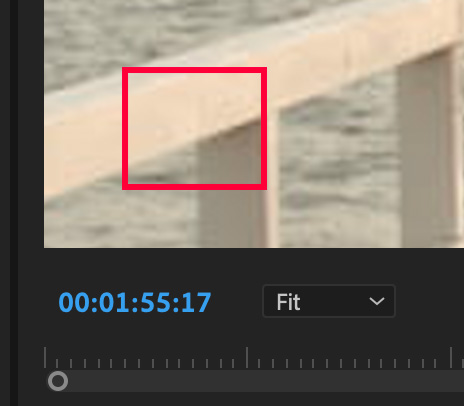
However, this watermark is impossible to see if the video has any sort of light background. (I added a red box to indicate where the proxy is located; it’s there, but you can’t see it.)
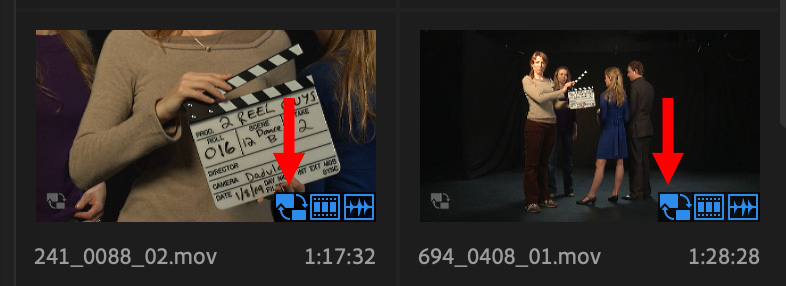
Another new feature flag when proxies exist is a “proxy badge” that indicates if a clip in the Project panel has a proxy associated with it. (The red arrows point to the proxy badge. The other two icons indicate that the clip has video (middle icon) and audio (right icon).)
However, the proxy badge only appears when you view thumbnails in the Project panel.
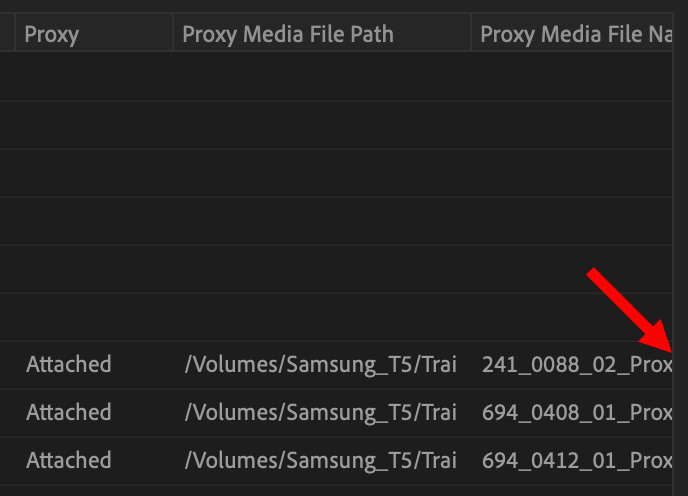
If you are viewing files in list view, the only way to determine if proxies exist is to scroll the Project panel AAAALLL the way to the right, and even then, the panel can’t be expanded enough to read the actual file name of the proxy file (red arrow). The file name gets cut off in full-screen view.
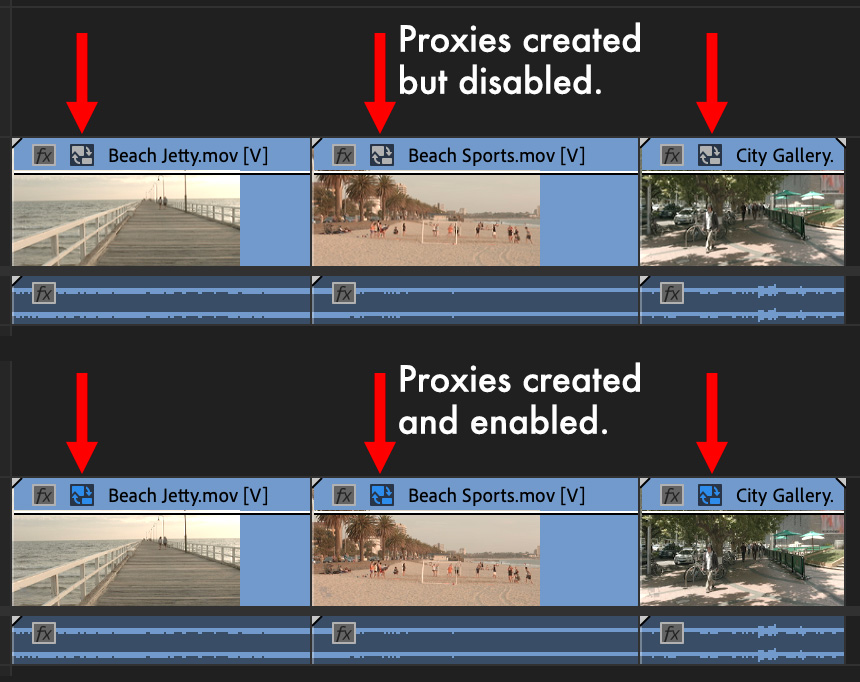
Proxy badges are also visible in the timeline. In the screen shot above, when proxies exist, but are not enabled (meaning you are looking at camera original media) the proxy badge is gray. When proxies are enabled, the badge turns blue.
This provides a fast way to know which clips have proxies and whether you are viewing camera source or proxy media.
SUMMARY
I am a big fan of proxies. They vastly simplify editing complex projects by decreasing the load on both computer and storage during editing. Proxies also mean we can successfully use older gear to edit larger, more complex projects.
Adobe has done a great job of simplifying creating and switching between proxies and original media. Anything that simplifies creating, identifying and editing proxies is a good thing. Proxies are a valuable tool for any project, especially large frame sizes and multicam editing.
While these symbols work as advertised (once permissions are properly set), they need improved visibility. I hope Adobe continues to refine these in future updates.
EXTRA CREDIT

To add a proxy button to switch between camera source and proxy media in the Program monitor:
NOTE: When the proxy button is blue, you are editing proxies. When it is gray, you are editing source media. This mirrors the colors of the proxy badges in the timeline.
6 Responses to Problem Fixed: Adobe Premiere’s New Proxy Workflow
Larry, this was an excellent, extensive tutorial on using proxies. Thank you for posting this.
Dennis:
Thanks for the kind words. I’m glad you liked it.
Larry
Hi Larry,
I believe I’m having the same issue as you did with proxies being created by Premiere and then sent over to Media Encoder and then…nothing happening.
When I go into my own Files and Folders preferences, it interesting lists “Documents Folder” as the only option of any box at all to check. It’s checked but there’s not a listing of the other folders at all, checked or unchecked. Wondering what you make of this and if I can fix this somehow?
Michael:
This sounds like a security settings issue. Contact Adobe Support – they will need to help you resolve this.
Larry
Hi, my issue is when we create our proxies multiple proxy files are created of the same clip. So we’ll have 4 mp4’s of the exact same file in the proxies folder.
The camera used was a RED camera. Unsure if this changes anything. We’d really love some help. Thanks.
Renae:
I suggest contacting Adobe support about this.
Larry