
 Burkhard Berger is the founder of Novum. Follow Burkhard on his journey from $0 to $100,000 per month. He’s sharing everything he learned in his income reports on Novum so you can pick up on his mistakes and wins.
Film effects are visual display elements used by editors and filmmakers to make the outcome of their videos more engaging and beautifully made. That’s where special effects, computer-generated imagery (CGI), and other visual effects come in.
Science fiction movies like Star Wars by George Lucas and Jurassic Park by Steven Spielberg are classic movies that pioneered CGI, pyrotechnics, animatronics, practical effects, and others that have paved the way for today’s movies. There’s no denying how film effects can significantly improve any film. The good thing is that you can do this too in your own videos.
In this article, we will only be focusing on an effect that can easily be used in Final Cut Pro – and that is retro film effects. So if you’ve wanted to achieve that retro look or vintage feel in your videos, make sure to read every section of this article.
Why Use A Retro Film Effect?
Videos are a way to entertain your viewers and convey information engagingly. We see it widely used in Hollywood through live-action movies, and stop-motion animations. Videos are even seen on social media and other platforms for various reasons.
For example, marketers use it for promotional purposes for their products and other high ticket affiliate marketing programs. Content creators use it to build up their brand. Film professionals use videos because it’s how they express their work.
Now as for retro film effects, there could be a lot of reasons to use it in your clips. A video creator could use this to show their flexibility and diversity in video creation. While a business could [use it to] produce a nostalgic feeling and play around the emotion analytics of its market.
Whatever the reason may be, there’s no denying that adding a retro film effect once in a while can give out a sense of nostalgia and fun. For example, suppose you’re selling something vintage on eBay. In that case, you can use a product video with a retro film effect along with your eBay listing template to really push that nostalgic feeling for your market.
When people see those black and white films or VHS VFX, it gives them a blast from the past. This can help in converting a certain age group of your market.
In terms of cinematic films, adding retro film effects is a great way to indicate that a particular scene in the film is from the past. It has been often used that viewers already assume that it’s taken from a different timeline from the one they’re watching.
Retro film effects have gotten so popular that even some businesses hired app developers to make it easy for content creators to have this element for their videos. Applications like these have become popular because they don’t require technical video editing knowledge.
There could be many uses for a retro film effect; however, not everyone knows how to use or create it for their footage. Fortunately for you, this article can teach you the basics without using a blue screen, green screen, and other complex edits like digital compositing, double exposure, and miniature angles.
The different sections below will teach you how to artificially make your videos into retro films using Final Cut Pro with ease. So sit back, relax and just follow the guides.
Creating A Retro Film Effect: Black And White
Black and white films were widely used from the 1900s to the 1960s. Movies and films had no choice since this was the only thing they had working for them. The first King Kong movie was black and white. Even Disney, which is a very prestigious animation studio, first released Mickey Mouse animations in black and white.
So if you want to give a retro look to your videos, the black and white film effect is a great option. It can easily suggest that a film was taken years back when videos didn’t have full colors as we have now.
If you’re showing things from the past like an old timelapse, the life of your parents, or any old setting, black and white is the way to go.
Even if a person isn’t showing old footage, many people still use a black and white preset for their images. It’s just a classic effect that people love to see. But if you want to add a retro film effect to your videos, continue reading below.
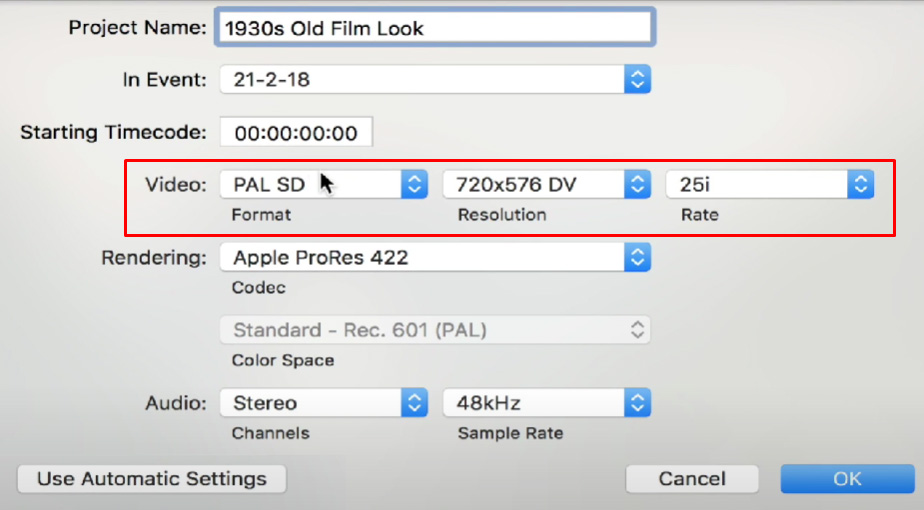
When creating a new project, do so with your usual process but when you reach the video format option, click the drop-down button and select “Custom”. You can set the resolution to a lower setting. A good resolution to start playing with would be 640 x 480.
After completing the file name and its settings, you can now put your footage on the timeline. Head on to the Video Inspector in Final Cut Pro. You can reach it by going to Window, then Show in Workspace, then click Inspector. It is located in the top right corner of the software.
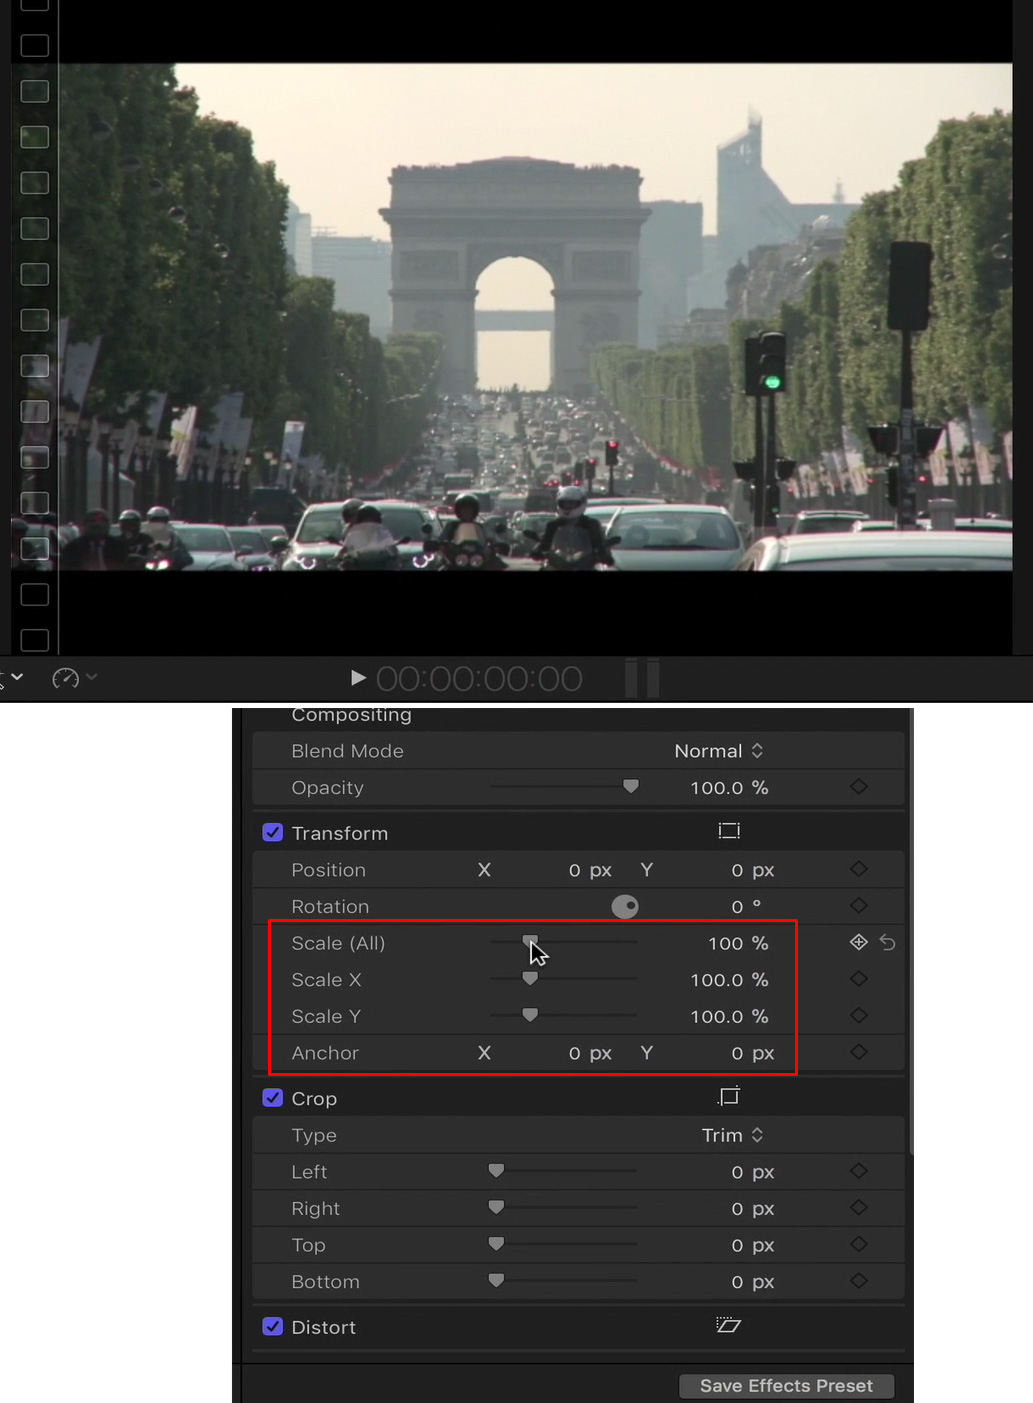
This particular feature allows you to zoom in and out, change the opacity, crop, stabilize your footage, and much more. To help you achieve a retro film effect, go to the Transform tab. You can move around the scale button to ensure your video fits the frame.
 (Click to see larger image.)
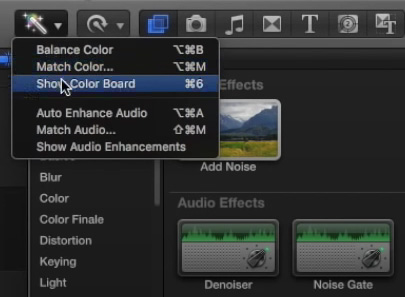
Next up would be bringing out the Color Board or the Color Inspector feature. This allows you to customize color, saturation, and exposure. Color allows you to adjust the tints of the clip. Saturation helps in adjusting the intensity of the clip while Exposure allows you to play around with the light values of the clip. This is a big help if you don’t have a big budget for studio and industrial lights.
In this process of achieving a retro film effect, go to the Saturation tab and drag down the master saturation by sliding it all the way down.

(Click to see larger image)
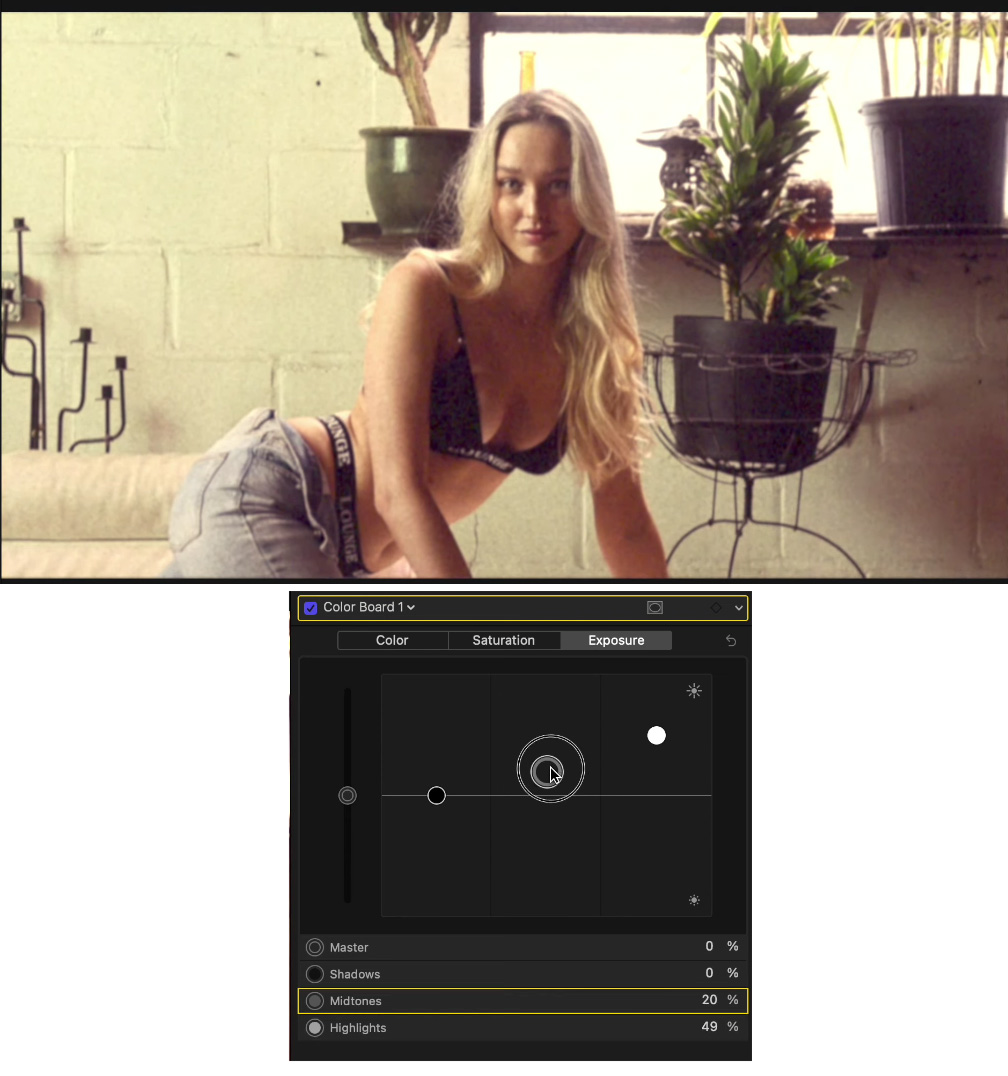
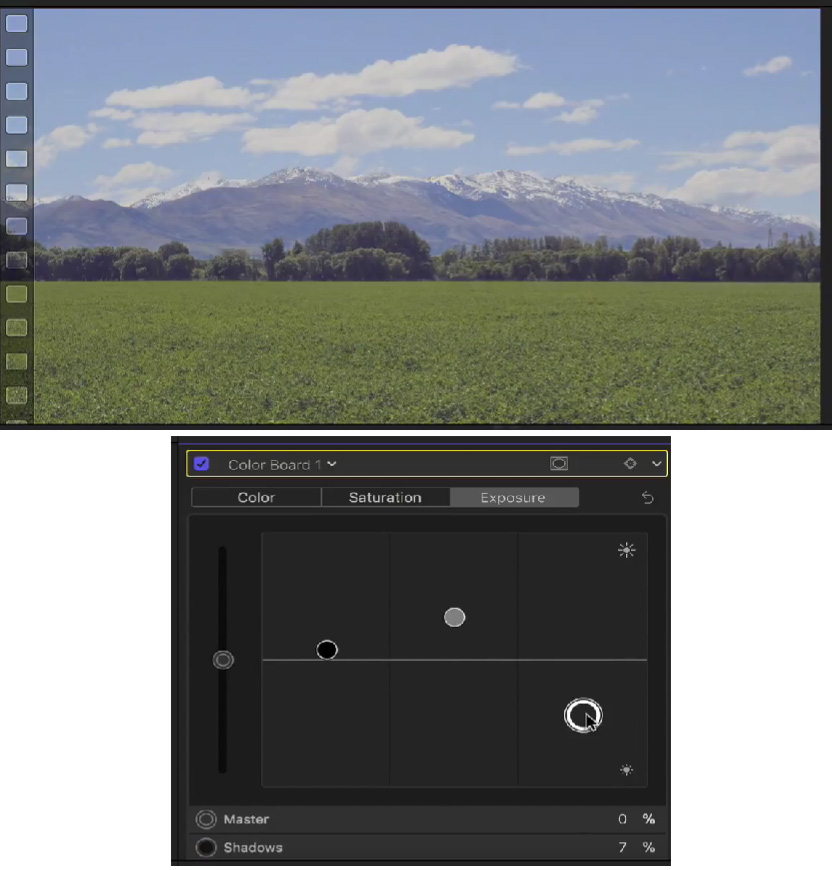
Once done, go to the Exposure tab. Bring down the Shadows puck just right below the line. Boost the Midtones a little bit, and the same goes for Highlights. This will help you in achieving a more old effect for your clip.
(Click to see larger image.)
Next up, bring out the effects browser and search “Aged Film”.
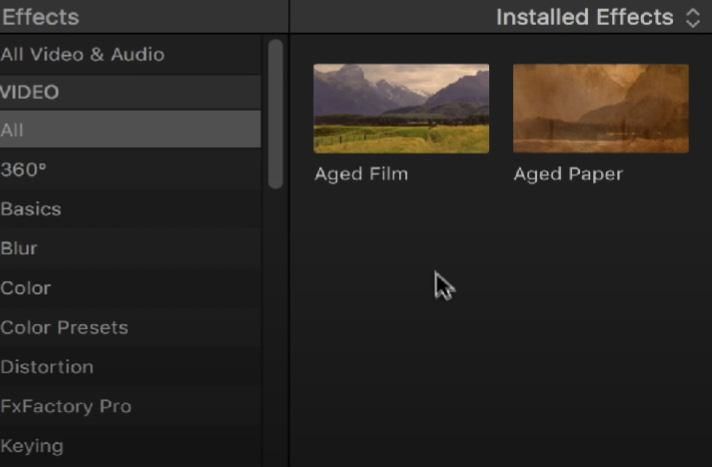
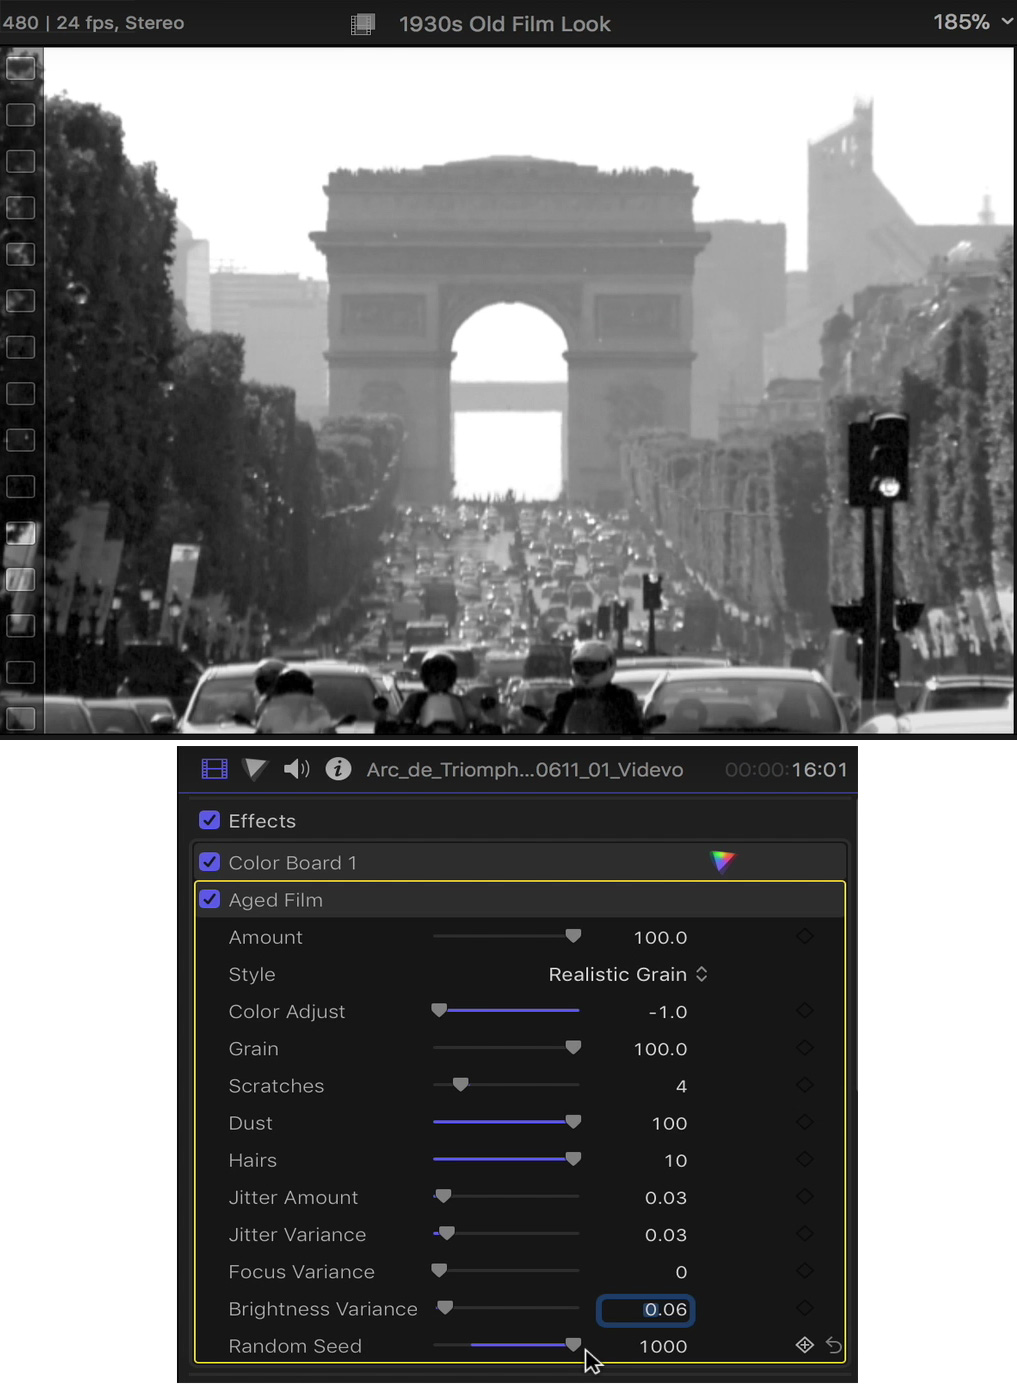
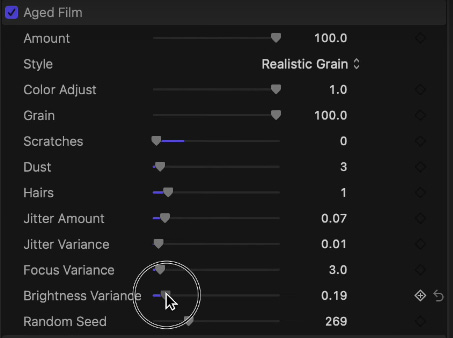
Click that effect or drag and drop it on your footage. Bring up the Video Inspector once again and find the Aged Film tool section. It’s the section where you can freely adjust some aspects of this effect.
After which, set the Style to Realistic Grain. For the Color Adjust, set it to -1.0 – it will help bring a black and white effect. Scratches should be brought lower, 4 would be fine. The Dust and Hairs should be at the maximum.
The Jitter Amount and Jitter Variance could be placed at 0.03. As for the Brightness Variance, set it to 0.06 or a figure a little bit higher than that. And lastly, Random Seed should be placed at max.
After adjusting these elements, go back to the effects browser and search for “Add Noise”. Drag and drop it again to your footage, then go to the Add Noise tab in the Video Inspector. The Type should be Gaussian Noise (Film Grain).
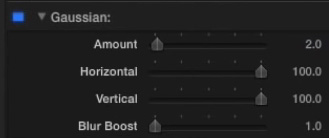
Go back again to the effects browser and type in Gaussian. Drag and drop it onto your footage and go back to the Video Inspector tab. Head on to the Gaussian tab and change the Amount figure to 2 or 3.
For a more vintage touch, go to the effects browser again and search Vignette. Go to the Vignette tab and set the Blur Amount figure to 3. The Darken can be between 0.6 to 0.78. And the Size should be maxed.
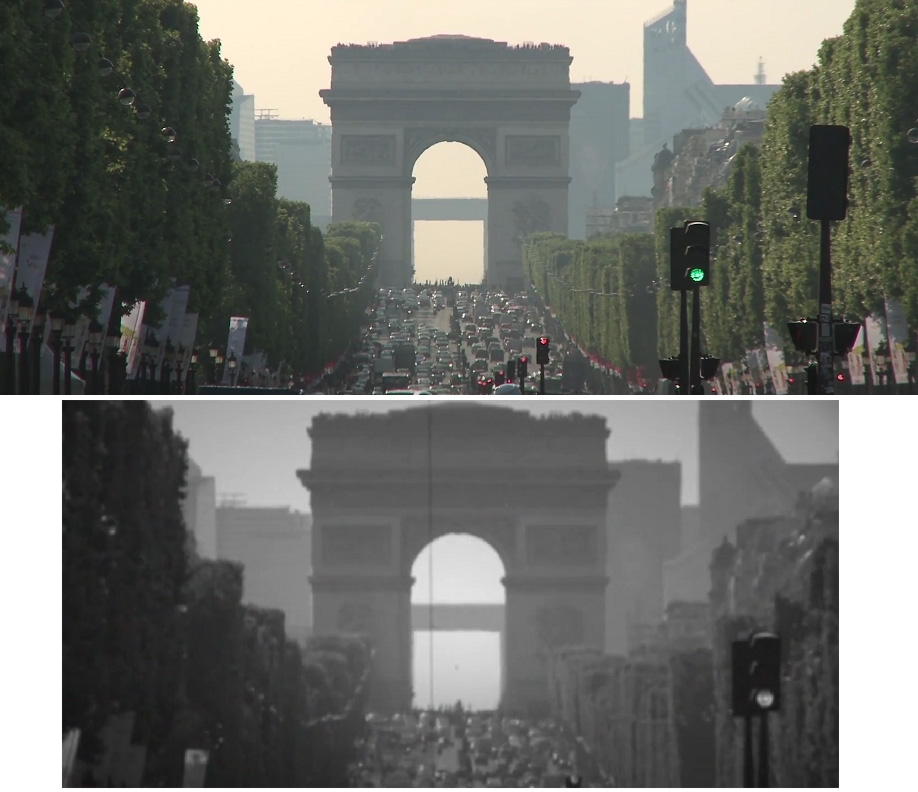
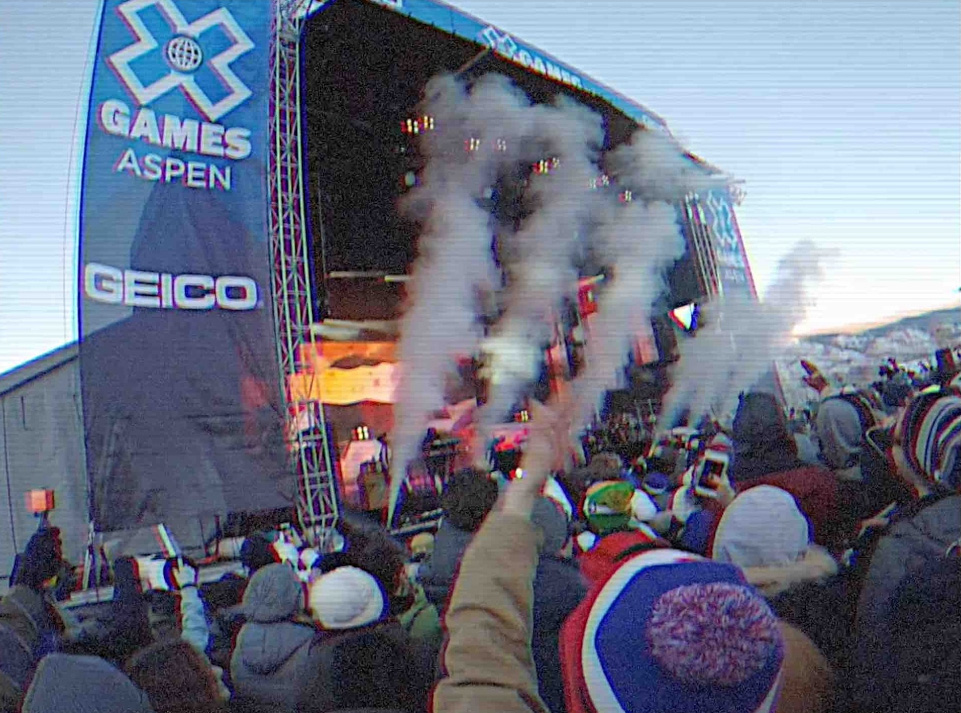
And that’s it! You have achieved a retro style film that’s sought after by many film editors. Ideally, your footage would have similar effects to the one below.
Creating A Retro Film Effect: VHS
If you were in the 90s, most of the classic action, SciFi, and horror films were on VHS. This was a time when mechanical effects and motion control were widely used. And it was in this era that classic movies like Titanic, Terminator 2, and The Matrix were first released on VHS.
There’s something about the VHS film effect that makes people love to see it once in a while. It could be the nostalgic effect, or it’s a unique edit that’s far from the very sharp and quality clips that we often see today.
This particular retro film effect has been seen in movies, independent video creations, advertisements to music videos. Businesses and video creators add this to their arsenal to show diversity, which helps convert new clients and increase customer retention.
You can recreate such clips using the old bulky and heavy camera gears like the Panasonic M5 VHS camera or simply follow the steps below. I suggest doing the latter.
We start this process by creating a new project. Name it what you want and once you reach the Video Properties section, click on Custom. The resolution you want to achieve here is something that the past videos had before, which means 1080p isn’t an option for you.
Go for a 480p resolution 640 x 480, then press OK. Next would be to import the footage you’re going to use and drag it on the timeline. Before any video effect is used, make sure to make your clip fit in the frame.
You can do so by playing around with the Scale in the Transform tab. Once the clip is in the frame, head on to the video effects browser and search Gaussian. Under the Gaussian settings, you can change the Amount figure to 2.0.
Next up would be adding Noise to the footage. The Amount figure for this particular effect could be 0.05 to 0.08. Once you’ve done this, you can see that your footage will have some noise to it. Not too much and not too little – perfect for a VHS effect.
Adding Sharpness to the footage will help as well. So find the Sharpen video effect and drag and drop it to your clip. Under the Sharpen feature, drag the Amount to an 8 or 9. This will make the added effects crisper.

(Click to see larger image.)
Now it’s time to play around with colors by bringing out the Color Board.
Once you’ve opened the Color Board, go to the Exposure section and play around with the Shadows, Midtones, and Highlights. There are no standard numbers for those elements because they will vary per scene. You’d want to increase the Highlights if the clip is dark and turn up the shadows a little bit. It’s vice versa when you have a bright clip.
Aside from the Exposure, you can also increase the Saturation of your clip. Try to increase and decrease these elements to achieve the type of look you’re trying to achieve. For the Color section, you can play around with the tint of the clip until it looks a little bit closer to a VHS video quality.
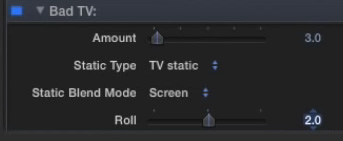
Another effect that we can add would be the Bad TV effect. After dragging and dropping it, the Amount element of the effect can be around 3 to 4. Then change the type to Tv Static, and Roll can be set at 2.
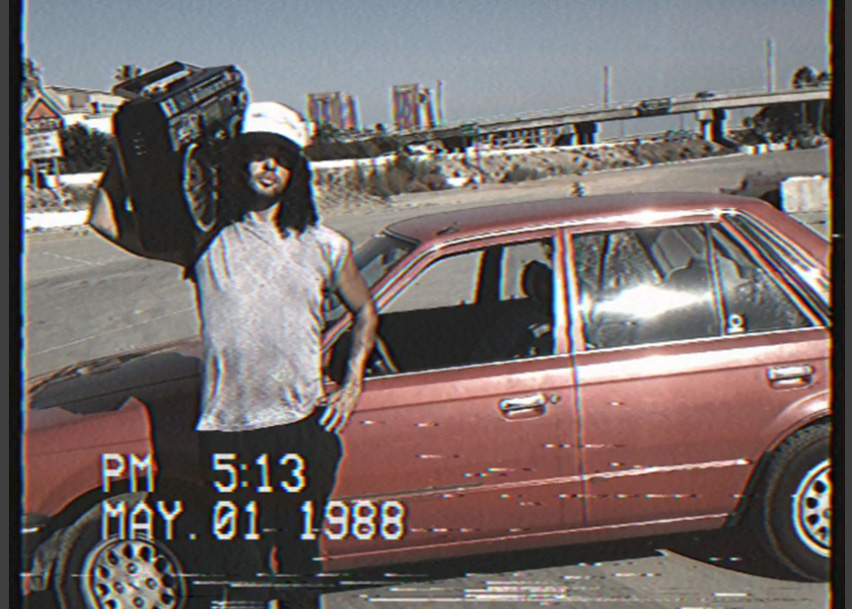
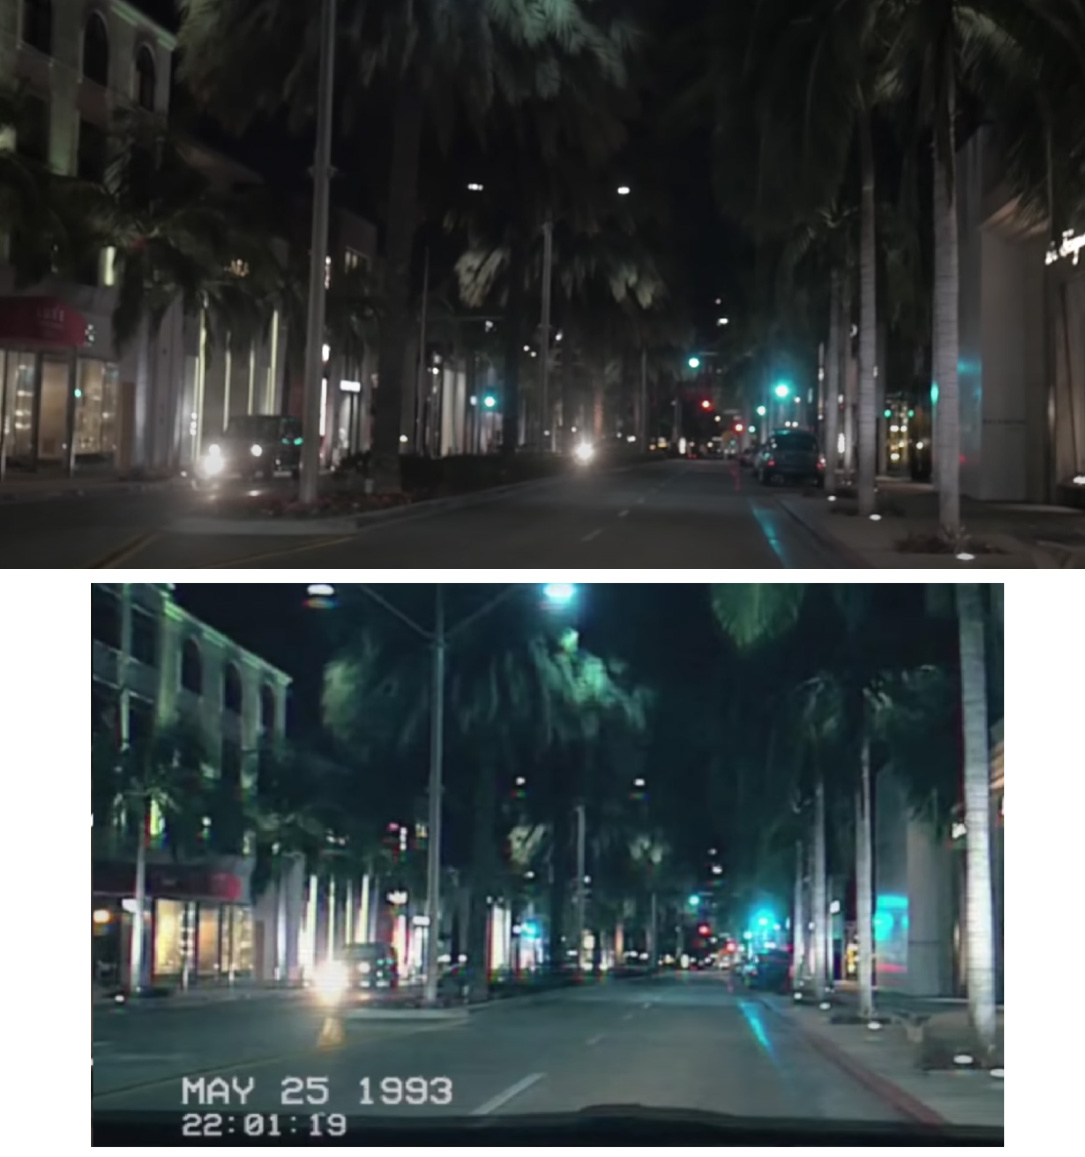
To make it more believable that the footage came from VHS, you can also add the date and the time stamp. This element is present in almost all VHS clips. It’s sometimes an indicator that the clip is old because new video recorders don’t have this elements in their videos. An example would be this one:

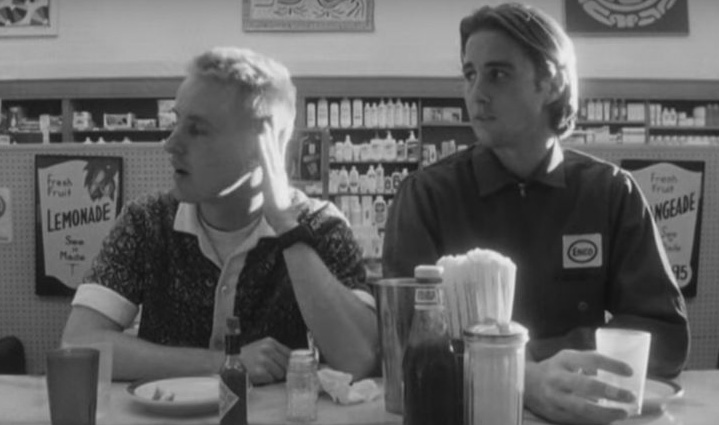
After following the instructions above and playing around with the elements mentioned, your work should look like a clip that came from the late 90s. Here’s a before and after shot of a clip placed side by side.
 (Click to see larger image.)
Creating A Retro Film Effect: Super 8
Anything that’s from the past will give out a nostalgic vibe to people. Whether that’s an old scrabble word finder game, a vintage toy like View-Master, or an old sneaker that was released in the 90s, this will give out a reminiscent feeling to people.
The same goes for Super 8 retro film effect because it’s quite popular in capturing that nostalgic feeling. If a director wants to create a flashback or wants to indicate that a particular scene or clip is from the past, this effect can help achieve that.
Common aspects found in Super 8 would be its choppy look, grainy effect, shaky film, and low frames per second. Professionals in the space also see Super 8 have light leaks and burns, which is very common in most edits nowadays.
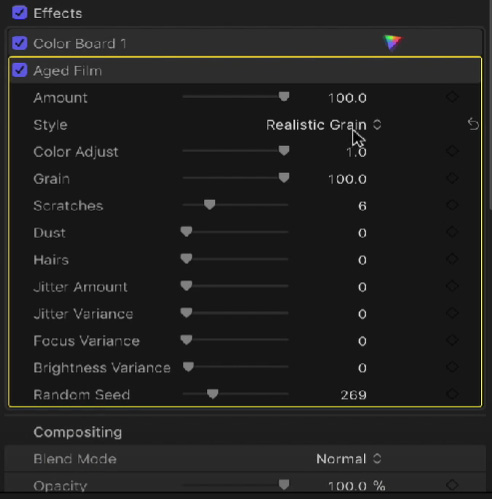
So to start, create a new project, fill in the necessary fields, and once you reach the Rate, go for 23.98p. Next, drag your clips onto your timeline. Once done, go to the effects browser and search for Film. You would see three film effects: Aged Film, Film Grain, and Film Noir.
Now drag and drop Aged Film to your clip and do the same thing for Film Grain. Next, go back to the effect browser and search for Gaussian. Do the same thing and drag and drop it to your clip.
Having a Gaussian effect would make your footage less sharp, which will greatly help achieve that Super 8 effect. Now go to the Gaussian effect settings and change the Amount figure to 5. For Film Grain settings, change the Style to Realistic Grain.
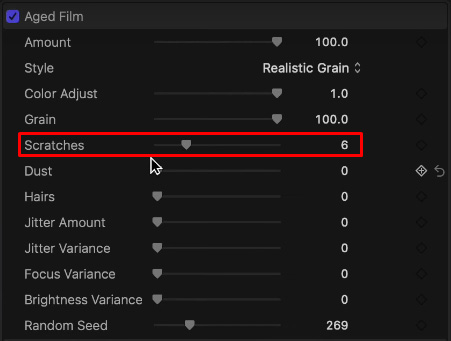
If you’ve seen a Super 8 film, you will notice that it’s not just grainy, but it also has black lines on its clips. Those lines are called scratches which can also be manipulated in the Aged Film settings.
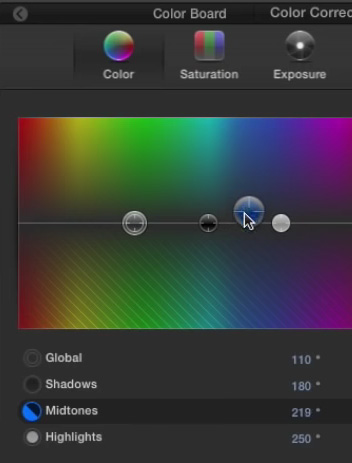
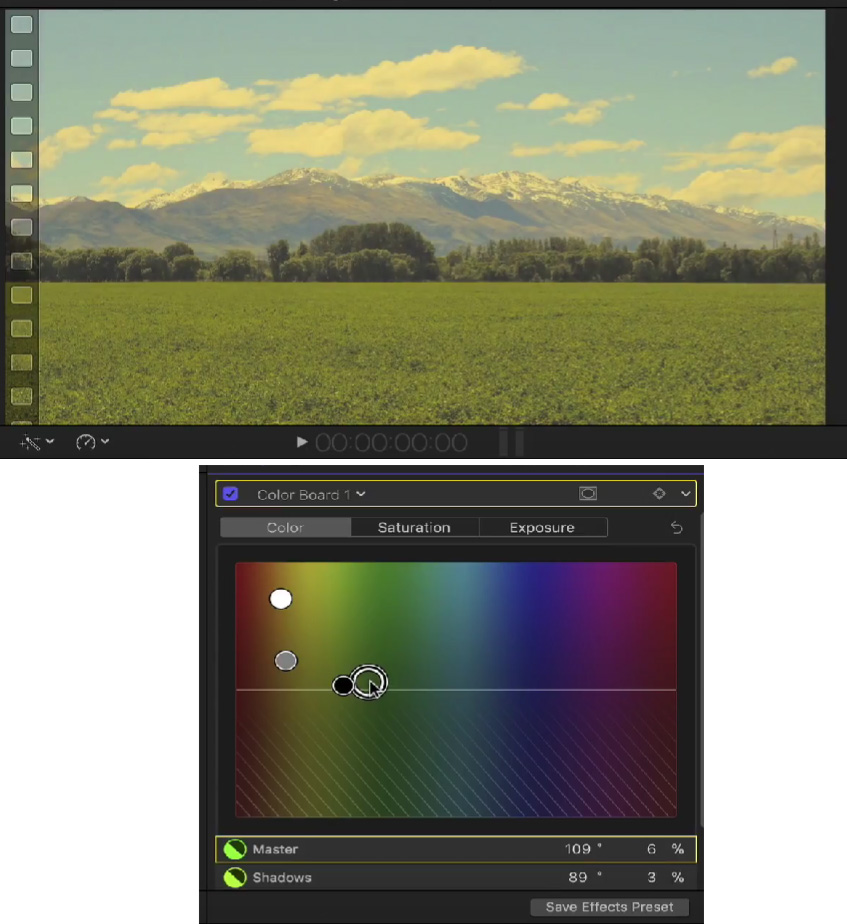
The next thing we’re going to do is click on the Color Inspector. It will show the Color Board wherein you can change the Color, Saturation, and Exposure. Let’s start with Color. Under it, go to Shadows and move it to around 290 to 300. Midtones should be near the area of the Shadows.
For Highlights, move it to the opposite side slightly to the green and yellow portion. This will help to balance everything. This is completely subjective, but if you followed what I said, your Color should be close to this.

In a genuine Super 8 film, you will notice that most of them would flicker. You can achieve this effect to make your clips look more real. To achieve this, go back to your Aged Film effect settings and go to the Brightness Variance. Increase this slider if you want more flickering in your video. If you want to eliminate it completely, put it to zero.
If you’ve noticed that your clip is kind of dark, you can go back to your Color Board and go to Exposure. You can play around with the Highlight puck and put it up until the video is bright enough for you. The same goes for your Midtones.
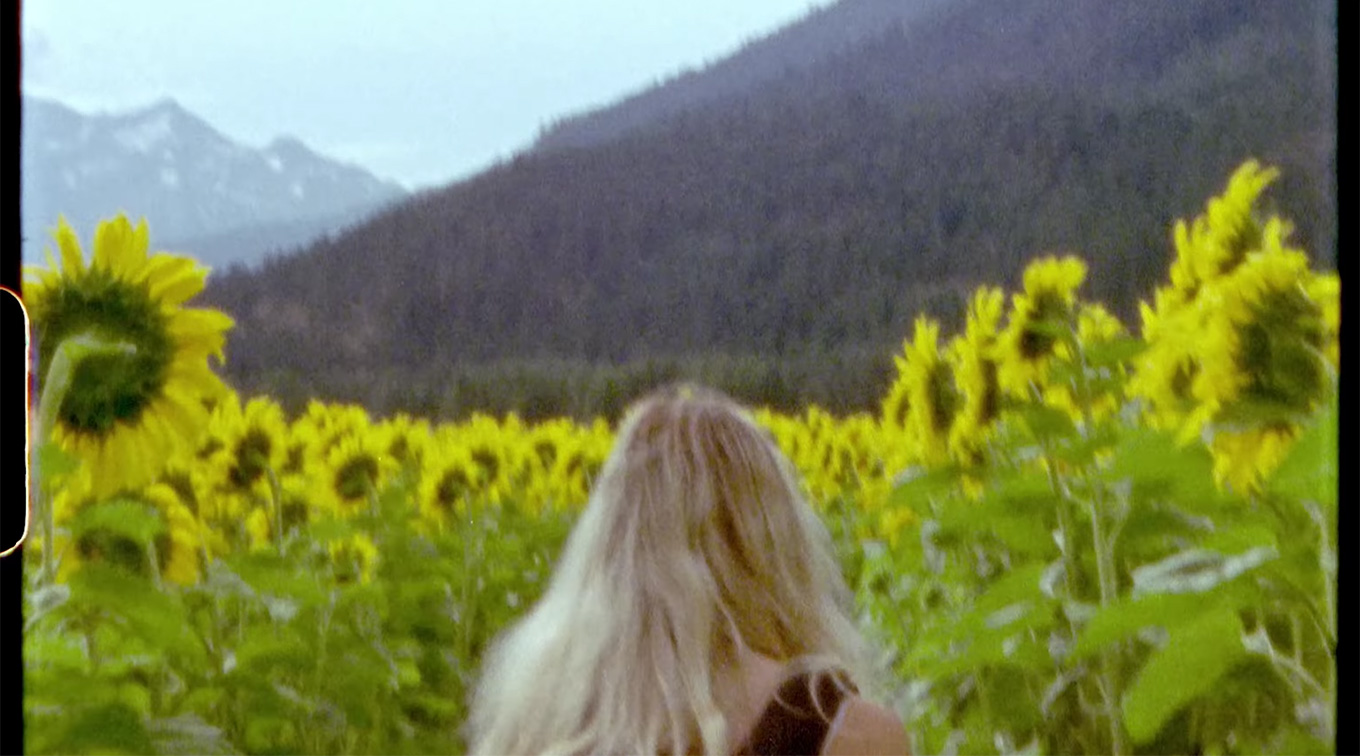
Once done, you basically have made your footage look like a Super 8 film. It will have that retro film effect that makes it look like it was shot from the 1960s. It’s a great skill to know if you’re an editor. It makes you more versatile with your output.
Creating A Retro Film Effect: Vintage Technicolor
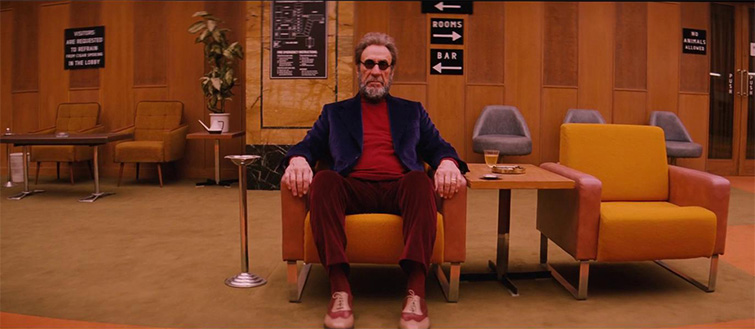
Technicolor has been used in many films, most notably James Cameron’s Avatar and Stanley Kubrick’s 2001: A Space Odyssey. But the most distinguished technicolor effect on big screens would be the vintage technicolor shown in the works of Academy Award winner and Oscar-nominated director Wes Anderson in his blockbuster films.
A vintage technicolor gives out an old vibe from the past but not very distant. It just helps in giving out a retro feel to the viewers. So if you want this effect, keep reading below.
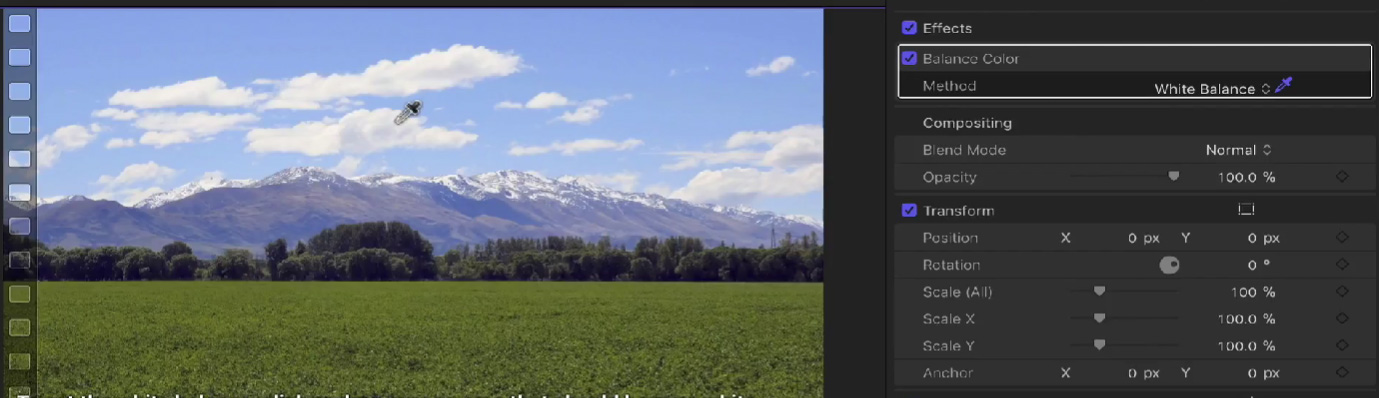
The first thing to do here is to get your footage on your timeline and head on to the Balance Color setting in the Video Inspector, and change the Method to White Balance. Next would be to use the eyedropper tool and then select the area you want to white out in your footage.
(Click to see larger image.)
After that, go to the Color Inspector and click on the Exposure tab. Slightly increase the puck for the Shadows, the same for the Midtones. For the Highlights, you’d want to lower it.
Next would be going to the Saturation tab. You can increase the overall Saturation, Midtones, and Highlights. As for the Shadows, you’d want to decrease it and place the puck all the way down.

Now go to the Color tab to bring out the Color Board. This is where you’ll see the digital effect more clearly. You can begin by putting the puck of the Highlights and the Midtones between the colors orange and brown. As for the Shadows and the Master in the yellow and green area.
What you want to do next is bring out the effects browser and search Add Noise. Drag and drop it into your footage. Go to the Add Noise setting in your Video Inspector. Set the Blend Mode to Soft Light and the Type to Gaussian Noise (Film Grain). The Amount should be around 0.2.
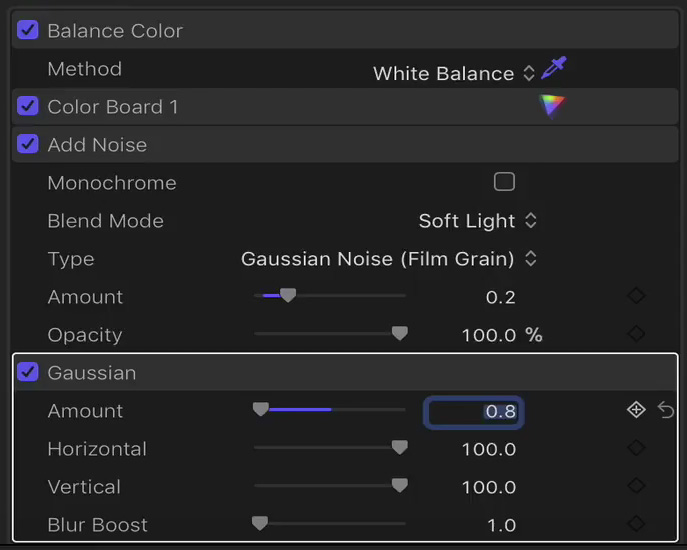
Go back to the effects search bar and type Gaussian Blur. Place it on your footage, then back up to the Gaussian settings on the Video Inspector. Set the Amount to 0.8. This is your finishing touch.
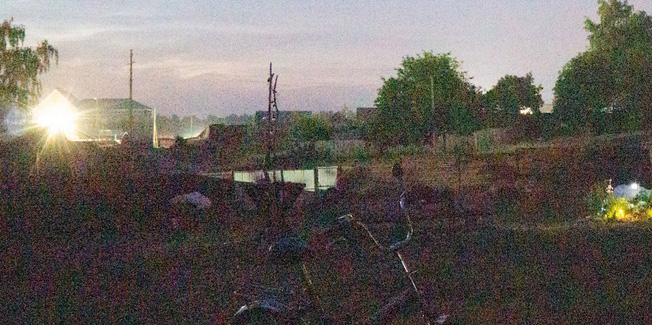
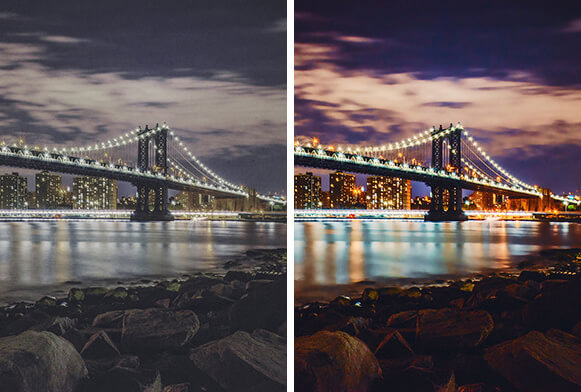
Once you’ve done everything above, you will clearly see a difference in your footage before and after comparison. What was once clear and sharp footage is now a bit grainy with an effect like an old device shot it.

(Click to see larger image.)
Elements To Customize When Trying To Go For A Retro Film Effect
Noise Effect
We know that videos and cinematography nowadays are sharp and very high definition. It has come a long way from the earlier times when it was grainy and quite dirty.
So if you’re achieving that effect in your clips, playing with the Noise Effect will help you. It helps in giving a grainy look and dirties your footage a little bit.
Color
This particular aspect plays a vital role in making your clips look retro. It’s one of those elements that you can play around with in post-production until you get the desired look.
Customizing the color settings is a great help because you’re shooting your raw footage on a device that’s already high definition which means that it’s far from being retro. With color settings, you can change your clip to black and white, making it less sharp and even a little bit discolored.
Frame Rate
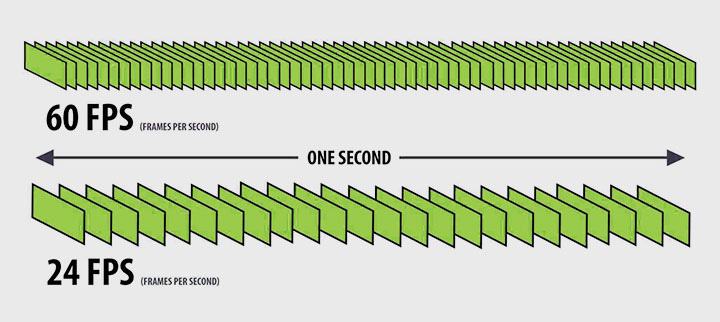
If you’ve been filming for many years, one thing you would have noticed would be how excellent devices are now today, especially when it comes to their frames per second (FPS). Right now, the average FPS in cinema is 24 fps. In some of today’s videos, it would reach 60 fps.
The lower FPS of the previous years should be the number you’re trying to achieve when changing your video frame rate for a retro film effect. A good ballpark number of working with would be 10 to 15 frames per second. This will greatly help in achieving that old video clip feel.
Fonts

Fonts also play a significant role in getting that retro film effect. This means it’s important that you make good choices with your font.
Not every video is plainly all recordings and motion pictures; some want to use texts along with SFX and VFX to narrate a story. So if you’re going to use this particular element, make sure to use a writing assistant like Grammarly and Hemingway.
Conclusion
Video editing, especially adding film effects, can now be done by anyone who has put in the time to study software like Final Cut Pro, After Effects, and others. We’ve seen the high-quality video and short films done without an effects team or effects supervisor.
As you’ve seen above, the instructions are not that hard if you would like a retro film effect for your video. You can even start with a black and white film effect. That’s a great way to achieve a retro or old-school vibe for your viewers.
So which retro film effect are you most excited to try out? Let us know! If you’d like to hone your skills and have a mentor to teach you, you can visit our training services.
One Response to How To Create Retro Film Effects With Final Cut Pro
The grail of old video fx for me is duplicating the “dark halo”saturation of old B&W image orthicon tube cameras when the brightest thing in the shot, like sparkly sequins on a dress, or shiny jewelry, is so bright the highlight turns black. The other classic period “look” is the burn-in of bright spots into a camera sensor. Sample image at this web site under “dark halo”: https://en.wikipedia.org/wiki/Video_camera_tube